Upcycling is Life (AE Theme Challenge)

When I saw that the Art Elements Theme Challenge for July was Upcycle, I knew I would have to post SOMETHING. Almost everything I create includes some kind of upcycling in it. I really could just make a long list of links and pictures and be done with it. But, it's more fun to share something new. So, before I get to a very short list of some of my previous upcycled projects, here's the "something new" I created. 

Before I go any further, let me explain what upcycling is. Here's the quick definition.

Basically, it's taking something old or intended for the trash and transforming it into something new or using it in a new way. This is the basis for most of the art I create day in and day out. So, I was almost intimidated by this being the theme for the challenge, because upcycled art is my everyday. Anyway...let's get back to that sweet little pendant I made. 

I began with a tiny round tin.


It's a tin for clock springs (I hauled in a TON of these at the beginning of the month and will have a thrifty haul to share next week.) This one had no counterpart and needed a new purpose. So, I started with it. 

After creating loops in the tin with headpins, I layered UV resin, paper, rub-ons, lace, and a paper butterfly (from a Tim Holtz Ephemera pack) in the recess of the little tin.


I layered and layered until I came up with something that made me happy.

If you're interested in learning more about the process I used, I will have a video reveal on the CraftyHope YouTube Channel on Saturday at noon (CST) that shows a very similar technique with a basic bezel. 

I'm really tickled with how well this pendant came together and can't wait to integrate it into a full necklace. As well, I have a massive stash of more of these tins now that will also be transformed in the future (yay!)

Now, I mentioned that I also upcycled loads of other things and would be remiss if I didn't share a few of them. First, almost everything in the CraftyHope Etsy shop includes some kind of upcycled item (almost).  Old cookie tins are one of my favorite items to upcycle into my jewelry.

These Boxed Owl Earrings are just one example of how I use the tin. 

Found objects are also often used in what I make.

Admittedly, I did not personally find the ceramic shard that's the focal piece of this Green Pottery Necklace, but I did give it new life with the addition of some solder and beads. 

Recently, I took old leather belts from the thrift store and made them into cuff bracelets.

Eventually, I will add other elements to them for personality and interest like this one that had (more) tin riveted to it.

But, it's not all jewelry-making for me. The most-watched video on my YouTube channel is my DIY Junk Drawer Wind Chimes video in which I show how to use an old tin can, wire, and items from your junk drawer to make a "wind chime."

If you're interested in some of my other videos on upcycling, there's also a Mixed Media Fairy Nook that was created for the Art Elements Repurposing theme challenge in April 2019 as well as my DIY Assemblage Owl that I made as part of the February 2019 "Birds of Prey" theme. 

And, my mixed media paper projects almost always include the upcycling of various paper materials (old book pages, receipts, photos, etc.) I confess that I am an upcycling maniac! But, alas, I didn't get much more made new this month specifically for the challenge. So, I hope some of those other older projects will inspire you to take something old and make it into something new and amazing. I mean, otherwise, it's just going to take up space in a landfill. Don't let that happen! Make something beautiful instead. 

Make your own Alcohol Ink Sprays

You don't always need the fanciest and most expensive supplies to create art. Sometimes, you can make the materials yourself using more affordable products. This is the case with these alcohol ink sprays. They're both easy to make and inexpensive!

And, even if you can afford the more expensive and name-brand sprays, it can be fun to make and customize your own art supplies too!

Now, this idea was not my own, I learned it from someone else many years ago and have since lost track of who it was that had the bright idea to combine markers and alcohol. But, as I've been asked several times how my Alcohol Ink Sprays were made, I thought it best to just go ahead and share the process. It's so simple. 

I was able to find all the materials I needed for these sprays at the dollar store (Dollar Tree). 

While I've really only used them as sprays, they can work as inks as well.


You can just put them in bottles without a spray nozzle and splash them onto your page.


As always, I'm more than happy to answer any questions you have about this or any of my other crafts. Just comment here or over on the YouTube video! 

Thanks

Bead Box 13 - Stocked

Let me go ahead and confess something. 

I've been struggling for weeks to find some inspiration for jewelry-making. Usually, I have a Bead Box stocked and ready for those moments. However, I used Bead Box 12 as a crutch during my 100 Day Project and flew through it. Ever since I finished it (both the box and the project), I've been grasping at straws to get back on the jewelry-making horse and bust out a few things. And, I'm finally getting there. 

I suppose I should explain the Bead Box. It's a basic 17-compartment plastic organizer. For several years, I've been packing it with designs to take with me when I travel or when my muse isn't speaking to me. Each compartment holds most of the components for a single design. Because of my creative block, it took me a bit of time to get this 13th version of the box packed up, but I knew that I had to before my trip out of town last week. And, though it took some time, I did it!


I really only got to work on one of these designs while I was away, but it was a relief to have the box in my bag with me, just in case. Here's what I packed in it.

While searching for materials that inspired me, I found the large, clear bead and thought it would be perfect to create a loop from. Then, the soldered bubble with the word "French" in it was unearthed. From there, the other elements just fell together. I added a handmade grungy resin opal charm (learned from Fanciful Devices' tutorial on Etsy) and black, clear, labradorite, and smoky gray beads to create a charms and a necklace chain.

The next several compartments were stocked with a variety of tin pairs that I altered in some way in order to make earrings. This one has tin ovals riveted to another larger piece. Holes were added at the bottom so I can add small bead dangles. 

I have to say how proud I am that I sketched out several of these designs so that I wouldn't forget what I had intended for them. These, for example, would baffle me otherwise. I like the contrast of the pretty pinks with the grunge and hardness of the dark wires and patina on the tin. They're going to make a neat pair of earrings. 

This fourth design is a bit of a shot in the dark of whether I'm going to like it. Many of my designs lately have been lacking buttons (and I LOVE me some buttons). So, I've included a pair here along with some altered tin bits, a wire form, and tiger's eye beads. We'll see how these earrings turn out. 

A bit more work was put into these as preparation for the bead box than usual. Really, I just need to add some bead dangles, and they'll be done. 

Again, I did more prep to get these into the bead box than I'll have to do to finish them. But, the intention of the box is to keep my hands busy, and this will do that for a few minutes. I just have to wrap a few beads onto the tin to finish these earrings. 

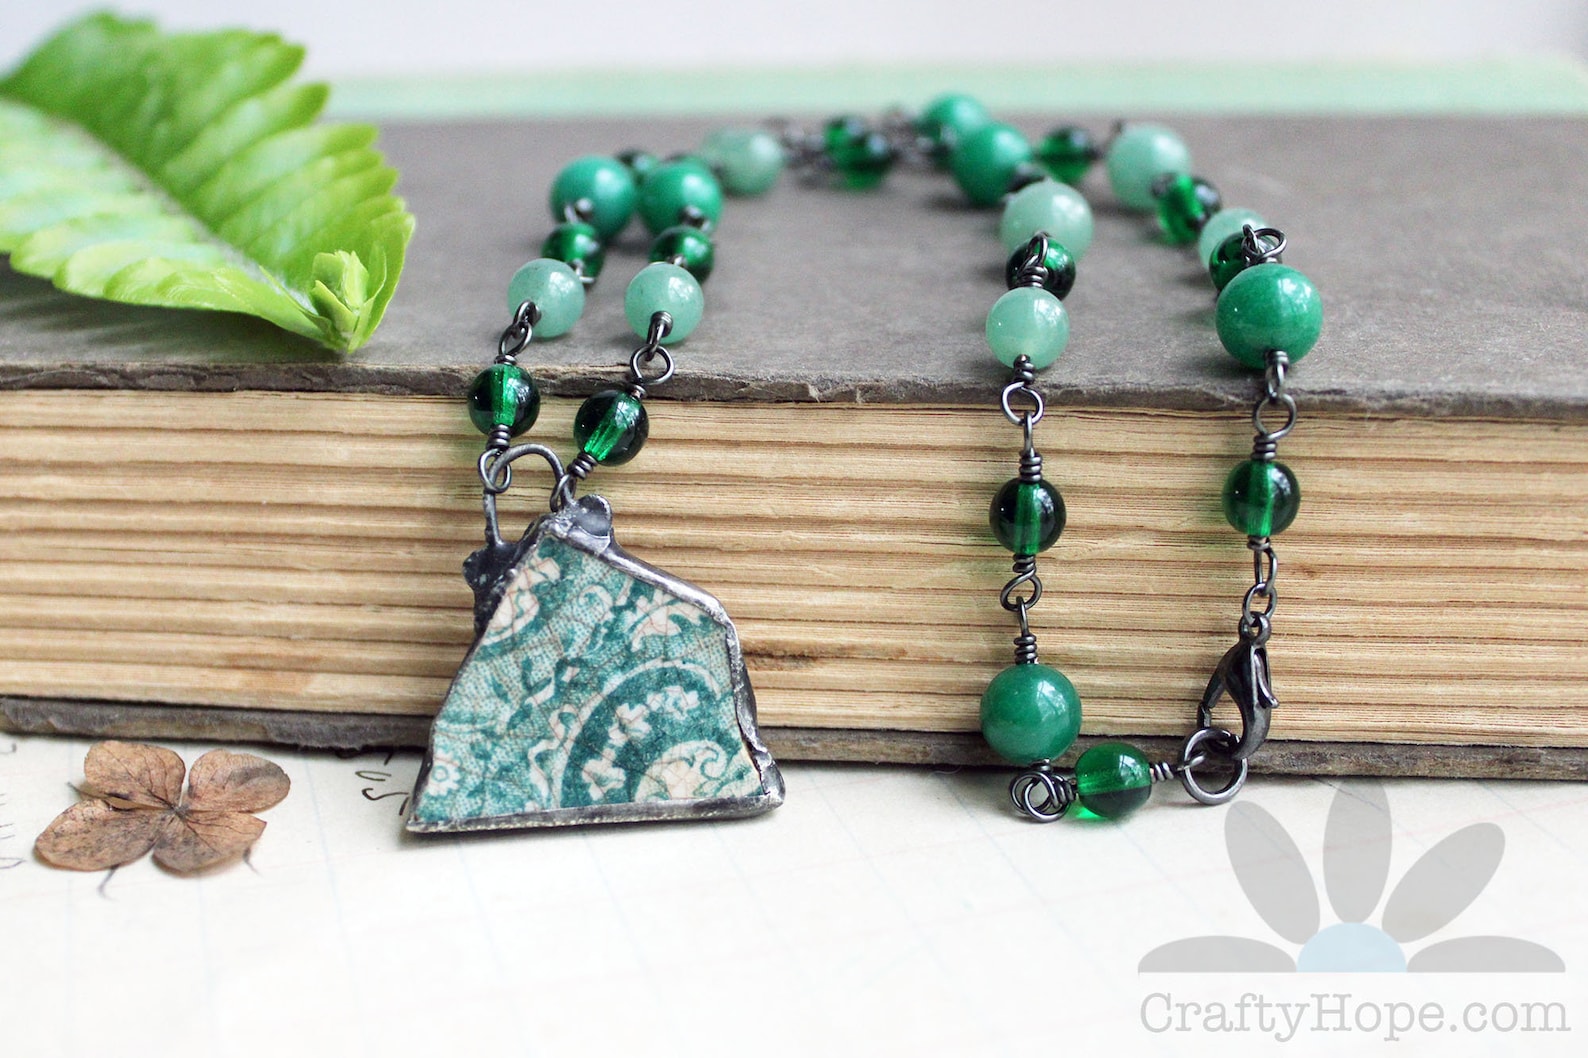
I felt like I had enough of the earrings for the time being, so I turned to some of my soldered pottery shards that are perfect for a necklace. This one just needs a simple design with a few beads and chain added. I went for jade to match the color on the pendant. The wire is packed in another bag for when it's needed. 

While I was in my bowl of soldered pieces, this bubble jumped out at me. And, the soldered amethyst pebble seemed perfect for it. I threw in a few amethyst beads, some gunmetal-colored seed beads, and a short length of chain to help complete this design. I began to feel like I was finding my groove again at this point of stocking the box. 

One more soldered pottery shard for good measure! The subtle textured pattern needed a bold statement to go with it, so I cut, embossed, and colored in red a snippet of tin. Crystal clear beads, glass pearls, and faceted red beads will help make up the chain of this proposed necklace. 

Bracelets aren't always my thing, but I like to make sure that I include at least one bracelet design in each bead box. (This one has several!) I love using these word tags from Tim Holtz for bracelet bars. The word was altered with some Vintaj Patina, and since the word is "Collections," I dipped into one of my own collections and gathered some buttons to make up its chain. 

Here's another earring design that makes me glad that I sketched it out. I'm pretty sure I saw something online that inspired this one. The pretty blue and white tin is paired with salvaged white seed beads and darkened steel wire. To tell you the truth, I'm looking forward to seeing what I'm supposed to do with these elements as I've plum forgotten!

Here's another of the bracelet designs. I'm usually inspired by the materials I have on hand. In this case, I saw a tutorial somewhere (I had to go back a-ways, but I found this Beadalon Pearl and Stone Bracelet tutorial), that struck a chord. I dipped into my personal bead soup to come up with these materials to create a bracelet that should have a few similar design elements. 

While I had my big jar of bead soup out, a few beads called out to me. I put them aside on my desk but before I knew it, they had paired themselves up with that soldered bubble. I'll string a few more beads onto the waxed linen before adding a chain that I'll select later.

Lookie, another bracelet! I guess the waxed linen in the previous design had me reaching for more. This will be a simple knotted bead bracelet with a button closure. The Tim Holtz charm will hang from it somehow.

I had a Pinterest page of beautiful tassel necklaces open for just a wee bit too long. As such, I decided to throw a few things together to create my own. There's some coral-colored sari silk and beads, a large bead cap, pale amber beads, and silvery beads that will all go into this necklace design.

I decided to dig through my bowl of leftovers from the Bead Soup swap and unearthed this pretty keyhole pendant. I believe it's from the Industrial Chic line. Once I had the keyhole, I needed a key. While Robin had sent me several, I was drawn to this crown one that was a gift from a friend. To keep it simple, I've paired them with freshwater pearls (also from Robin) and some clear round glass beads. I'll turn these elements into a pretty necklace. 

This final design took a bit of time (tin designs always do!) I created a bracelet bar with two different tin patterns, rivets, eyelets, washers, and leather. I'm so tickled with it!! I'll be adding a simple chain of green beads to compliment the focal. 

I'm looking forward to working on each and every one of these designs. However, I'm trying to let them sit in there so that the original intent of the box remains intact and the box is only used sparingly. In the meantime, I've been looking for inspiration in my stack of old beading magazines. And, thankfully, I'm finding quite a bit! I've got a list of techniques to try and designs to make that should keep me busy for a while. Even though I'm revealing this box now, it might just be a bit before you get to see the finished designs - we'll see. For now, you're welcome to take a look at some of the other stocked bead boxes and their reveals. 


So, has anybody else been suffering with a dip in their inspiration and motivation lately? How are you working to overcome it?

July Challenges and Inspirations

 I'm running a bit behind as I was out-of-town most of last week, but I can't bear not sharing the inspiration and challenges I've found for the month of July. I know they've all got my interest!

  • First up is ICAD (index-card-a-day) that I mentioned last month. It's actually in the home stretch for the original time frame of June and July, but there's nothing saying you can't use the prompts for inspiration at any time. Find all you need to know about ICAD on the Daisy Yellow site. 
  • Sarajo (and her husband, Eric) have revealed the Inspiration for the July Honey Do List. It's an interesting one, full of texture and shapes. Make sure you check it out. The linky tool will be up on SJ Designs Jewelry on the reveal date of July 26th. Note that Sarajo leaves the tool open for about a month from the reveal date so you have plenty of time to show off your jewelry creation. 
  • This month, the July Theme Challenge from Art Elements is Upcycle! It's a topic that's near and dear to my heart. As such, I'm really hoping to get something, anything made that fits the theme. You can reveal your upcycled makes any time during the month in the Art Elements Community on Facebook
  • The Halcraft Collection has shared the July Pretty Palette Inspiration that they're calling Sweet Peach Iced Latte. As you can guess, it's made up of creamy neutrals and peachy-pinks. Get all the details about their challenge by following the above link. 

And, that's it for this month. Hopefully, the July heat isn't getting to you and draining all your creative energy. What are you doing to stay inspired?

Chain Link Earrings: Part 8

It's easy enough to stack a bead or two on a headpin, make a loop, and add an ear wire to make a quick pair of earrings. But, if you're looking for a few other interesting ideas, you've come to the right place!

Today, I'm sharing tutorial 8 of 10 that uses large links from metal chains as the base for an earring. These tutorials begin with the simplest of techniques and work toward harder ones. Though, none of them are very complicated. 

You can find all of the tutorials in my Chain Link Earring Playlist on YouTube. 


The tutorial for this week involves stringing colorful seed beads horizontally inside an oval chain link. This technique is not new, and this isn't the only way to do it. But, it provides a great option for brightening up an otherwise boring, large link. 


You can head over to YouTube to watch Part 8 of this Chain Link Earring Series or just watch it below. 

As always, if you have any questions about this tutorial or anything else I've shared or said, don't hesitate to ask!

Thrifty Thursday - June Thrifty Haul

Hey, y'all! If you don't know by now, I'll remind you that I adore picking up items I can use in my art for a great deal. I shop thrift stores, dollar stores, yard sales, antique markets, clearance aisles, and anywhere else where there's a bargain to be had. I love to share my excitement over the treasures I've discovered in a haul video each month. And, today is the day for that video!

Today, it's a long one as I scored BIG TIME at a local antique store's monthly estate sale. 


As well, there were a few pretty sweet finds at my local Goodwill. 


I also found a few fun clearance items at Hobby Lobby and scored some things at a couple of antique stores. It was a good month! Watch and see in my June Thrifty Haul video. 

So, have you found any treasures lately?

Art Journaling Videos in June

In case you missed all of the action going over on my YouTube Channel (there's a ton right now!), here are the Art Journaling videos from June that I haven't shared here yet. 

Art Journal Spread: Believe in Yourself

Junk Journal Page: Collect Beautiful Moments

Art Journal Spread: All she ever wanted

ICAD 2021: Card 1

ICAD 2021: Card 2

You, Me, Same 3 June 2021: Junk Journal Spread

ICAD 2021: Card 3

Clicking on the picture or caption will take you to each of the videos. Right now, I'm in the depths of ICAD (Index Card a Day) and will be posting those videos each Monday, Wednesday, and Friday until I get them all up. I hope you enjoy these and don't hesitate to let me know if you have any questions at all!

Reveal for June Honey Do List

Two posts in one week! That hasn't happened since the beginning of the month. I must be getting back to feeling like myself. (Here's hoping the trend continues.) I've been off my game when it comes to challenges lately, so I made a little time over the weekend to take a good, hard look at the inspiration photo from Eric and Sarajo for the Honey Do List At SJ Designs Jewelry. And, it worked. Almost immediately, I had an idea. 


Okay, so this means nothing to you if you haven't seen the photo. 

Apparently, those are Lady Slippers. 

While I now see how the center shape is reminiscent of a ballet slipper, the general bulbous shape is what drew my attention. I decided to cut something similar from tin and see what I could do with it. As well, the tendrils from either side made me think of copper wire. So...I had a direction.


I knew that the bright yellow wasn't in my stash of tin. And, I was aware that it wouldn't really make for the most appealing earrings. So, I skipped that entirely and focused on that shape. 


I have to admit that I had hoped to do something more with the copper wire. I tried flattening and twisting it, toyed with altering the color with a torch, and even tried making ball-end headpins. Alas, none of those techniques worked out as I had hoped. So, I kept it simple so that I would be able to actually FINISH A JEWELRY CHALLENGE! And, I did that. So, it feels like a win. Make sure you head over to SJ Designs Jewelry to see what Sarajo and the other participants made with the inspiration from Eric. 

How are you doing with the whole "getting back to normal" thing?

The 100 Day Project 2024

Yesterday, the 100 Day Project for 2024 started (it's not too late to join in!!) I mentioned last week that I would give you a heads-up ...