Inspiration Jar (and Bowl) for Jewelry Making

I have too much stuff. I'm positive it's part of the American experience in general, but the clutter and chaos and overwhelming nature of it all often block me creatively. I've been aware of this creative block for some time but finally came up with a solution: An Inspiration Jar (and bowl)! 

I knew that if I could narrow down the options I have, I could actually focus on being inspired by the plethora of found objects, art beads, thrifted treasures, and all the other amazing materials I've collected. Many of those were buried, forgotten, and put aside. I felt if I had just a small selection of them in a bowl on my desk I would have them on hand, ready for transformation. 


So, I set about sorting through all the jars, drawers, shelves, containers, and hidey holes in the craft room to unearth those treasures. I thought I was being very selective and only pulling out the bits that inspired me RIGHT THEN. But when I was done sorting, I had two bowls spilling over with inspiration. 


I recognized immediately that these needed to be contained a little better. So, I switched to the idea of a jar. Alas, that was still not large enough for all I had gathered. Instead, I placed most of the beads in a decorative bowl and put the pendants, art beads, charms, and other beauties in a jar. 

Wanna see what I selected?

First, there were the chandelier crystals and vintage buttons.

Next up were my drawers of found objects, junk, charms, salvaged materials, and whatnot. So much awesome.

From there, I dug through the art beads: such lusciousness!

After that, there were a few miscellaneous items stashed around the room.

Then, I dug through some beads...

and some more beads!

You see, it got out of control. But, at least some of my stash is narrowed down for me to focus on. In fact, I used much of this when I put together my Bead Box to Go. Sifting through this small collection made it much easier to come up with design ideas. I wasn't as frustrated with having too many options. 
Instead, I have a concentrated amount of materials from which to choose. What a wonderful thing!

And, it's all contained fairly neatly!

It's definitely a relief to not be overwhelmed with options when I'm ready to make. Sometimes the sheer number of options stops me in my tracks. I'm sure I'm not the only one who has this "problem" of overabundance = creative funk. I hope this idea of narrowing down the materials helps other artists narrow down their focus too. 

Holiday Sale in CraftyHope Etsy Shop

Happy Thanksgiving y'all!!

I can't believe the Holiday Season is upon us! If you're shopping for the unique and wonderful women in your life, how about some unique and wonderful jewelry for them? I'm having a sale in the CraftyHope Etsy shop to assist you in your endeavors to find perfect, affordable gifts. Here's a selection of what's available.

Delicate Key Necklace

Mismatched Tin Earrings
Rhinestone Key Bracelet
Tarnished Heart Earrings
Pearl Sphere Long Necklace

Simple Smokey Earrings
Golden Assemblage Fringe Necklace
Those are just a few examples of the vast array of items available. The whole CraftyHope shop is going to be 15% off Friday-Monday (Nov 24-27). I hope you'll take a peek!

15 Inspiring DIY Ornaments (from found objects & upcycled materials)

The holiday season is undeniably upon us. It's only a few days until Thanksgiving and then it's all downhill to Christmas. I know several of my friends have already started decorating. And, in going through my blogrolls the other day, I noticed that at least two of the sites I follow are having handmade ornament hops. These sound like a great dose of fun and a good way to get in the holiday spirit, so I decided to look around for inspiration. I started with my Pinterest boards and fell down that rabbit hole. When I emerged, I realized that it might be nice to share some of the holiday pretties I discovered in case you need a dose of inspiration so you can participate in one of these hops or an ornament swap too.


I'm linking back to all of the original blog posts and instructions, so if you want to pin or share them, please make sure to visit their creators and don't pin from here!! For now, here's a better look at each of them!

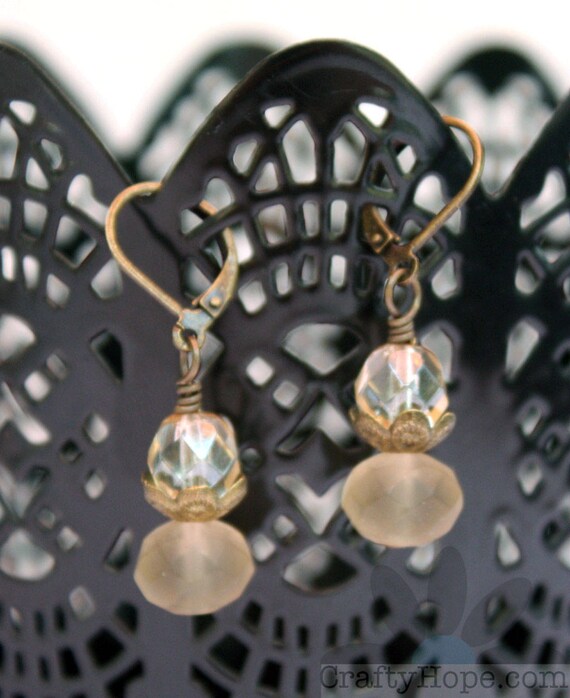
1. Jenn from Jennuine used chandelier crystals, beads, and family photographs to create Crystal  Family Photo Pendant Ornaments. Chandelier crystals are pretty easy to find at most antique stores. Of course, most places (even hardware stores) that sell light fixtures often have chandelier crystals too.

2. Toilet paper rolls and loads of glitter are two of the main ingredients for this adorable Up-Cycled Toilet Paper Tube Ornament from Diana of Adirondack Girl @ Heart.  Learning I can make something this precious with TP rolls, make me feel a little guilty for throwing them away.

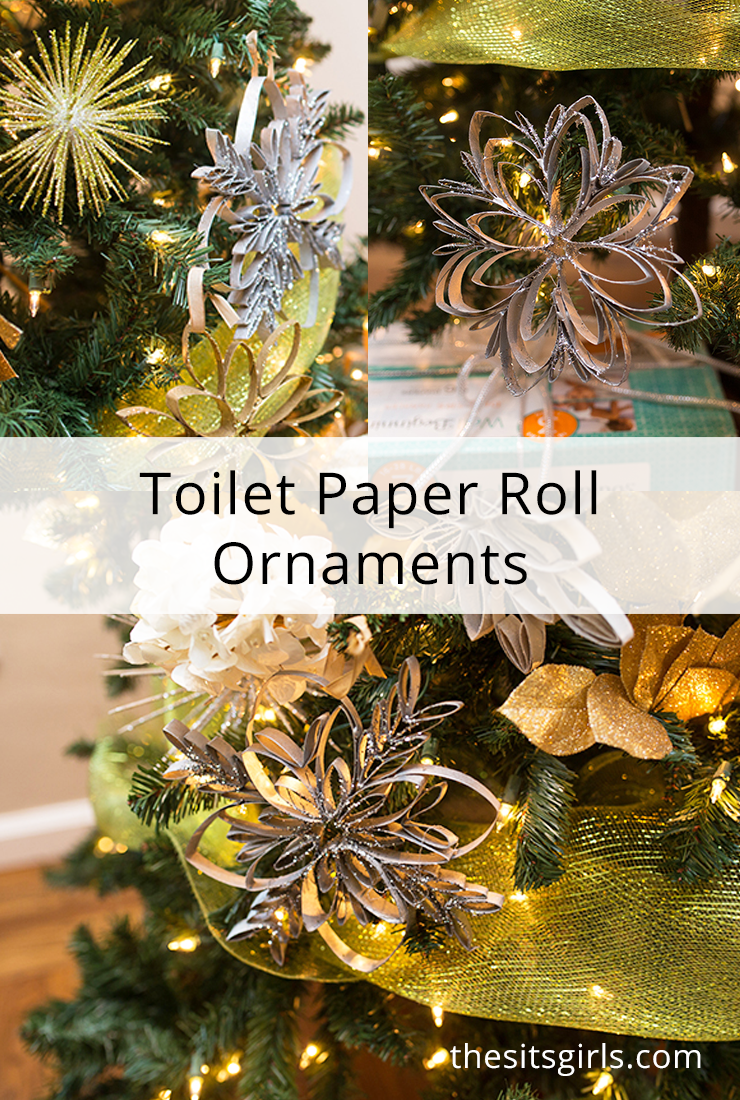
3. Again, TP tubes and glitter are the main materials used to make something spectacular for your tree. The Sits Girls made Handmade Christmas Tree Ornaments from the tubes by cutting them and assembling the pieces to form snowflake/flower inspired shapes. That could even be a fun kids' craft!

4. You could use any kind of wire you have around the house to create Wire Angel Ornaments like Rachel from Adventures of a DIY mom did. I think the primitive feel of these is so cool. And, look at the variety of shapes she was able to create! Of course, you could add other elements (beads/paper) to them, but the simplicity is stunning!

5. If you've visited my blog long enough, you know I'm a fan of old jewelry. Add in chippy paint, and it's all over for me! When I discovered these Salvaged Jewelry and Wood Ornaments from Carlene at Organized Clutter, I was absolutely swooning.

6. In addition to all the other craft supplies I hoard, wooden spools are definitely on that list. You can obviously buy them new at the craft store, but they can also be found at thrift and antique stores. Nikki at Whimsy Love made a Wood Burned Spool Ornament that I think is an interesting take on upcycling a spool.

7. Michelle at the Painted Hinge made some perfectly farmhouse-style Mason Jar & Chicken Wire Ornaments. The lids and wire are things that I know I have sitting around my house. And, I love how versatile the decorations for the inside can be. You could go in any direction with them!

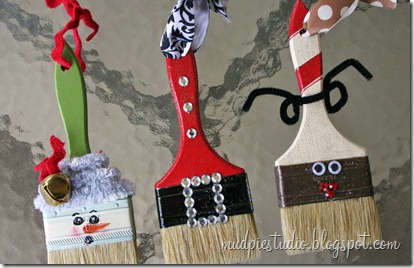
8. I've got a few old paintbrushes saved to upcycle into something fantastic. I just haven't been able to decide what. I hadn't even considered making them ornaments. Mud Pie Studio has me re-thinking that with her Paintbrush Ornaments. I mean, how stinking cute are these!?

9. More wire! And beads!! Emily at Everyday Art shared these Wire & Bead Ornaments touting that they're even easy for kids to make. I love the idea of using up some of my bead soup and old wire. The quality of beads doesn't even matter because once made they just add a pop of color. Fabulous!

10. Can you guess what these Mini Wreath Ornaments from Smile like you Mean It are made of? Shower rings!! I've seen plenty of those at the thrift store, along with hunks of yarn. Of course, those materials can also be found at the dollar store too for inexpensive decorations.

11. Twigs and old paper are the key elements in Recycled Paper Twiggy Tags from Barb at Keeping Up with the Times. Old paper is one of my obsessions and the rustic-ness of the twigs warms my heart. So, these totally caught my attention.

12. Yes, more wire. The Handmade Star Wire Ornaments from Alyssa and Carla are so very simple and stunning. Any type of wire could likely be used to create your style. And, beads or other charms could easily be added for an extra touch.

13. Ornaments can be made for materials as simple as some paper. I adore the simplicity and bright colors in these Paper Christmas Ornaments from Dream a Little Bigger. The technique is easy enough and I can totally see using any variety of papers to create a version of these.

14. Tea Strainers!! What a great way to re-use something that might have otherwise been tossed aside. The addition of crystals just makes them sparkle. I love these Tea Strainer Christmas Ornaments from Sadie Seasongoods. It's a great reminder to look beyond the traditional craft supplies for inspiration.

15. Here's another idea that uses an unconventional kitchen item. The DIY Vintage Farmhouse Style Baking Mold Ornaments from Kreativ K are perfectly rustic but still shiny. And, the link is part of a DIY ornament hop for even more ideas! How about that!?

As for the two hops I saw,

Visit each of those sites for additional details about the hops (how to sign up, what the requirements are, etc.) If you're hosting an ornament swap/hop or know about one I can add to this list, please don't hesitate to let me know.

I have to admit that I haven't YET signed up for either of these hops, but now that I have all this inspiration...I guess I better hop on it (har har har). I hope this list has inspired you as well!

School Soup Recipe

It's finally been almost chilly here for a few days. So, you know, soup weather! Actually, I have to admit that we eat soup year round in our house. But, we really get to craving it as the weather cools. One of our favorites is a family recipe of mine that we call School Soup.
Vegetable Beef soup for a chilly day

It's basically a beef and vegetable soup. I really don't know where the name came from. I always thought it was from my great-aunt who had worked as a school cafeteria lady, but I think I was told that was wrong. In any case, it's a wonderfully easy and filling soup that will always be in rotation around here.

The ingredients are pretty basic (not pictured are salt and pepper - they were shy)

Chop the onion and throw it in a LARGE pot with the ground beef. Cook until the beef is brown and cooked through. Drain and return it all to the pot.

Add all the canned vegetables in their liquid.

Add the chopped potatoes along with granulated garlic, salt, and pepper (to taste).

Bring it all to a boil and cook for ten minutes.

Here's the beauty of this recipe...You can shake in some Worcestershire sauce and be done OR you can go the extra mile and add some pasta. We tend to add the pasta. It makes the soup go further and, well, it's pasta! We love us some pasta.

Pour in your pasta (about 1/2 a box) along with 1-2 cups of liquid (water or veg/chicken stock). Bring the soup back to a boil and cook until the pasta is done. Add a few shakes of Worcestershire sauce and stir.

This soup is one of Pat's favorites. And, I had to learn how to make it straight from my grandmother because she was the master of School Soup.


Here are the complete ingredient list and instructions for you.

SCHOOL SOUP

Ingredients:
1 lb. Ground Beef
1 can Diced Tomatoes
1 can Peas
1 can Corn
1 can Lima Beans
1 can Carrots
1 can Green Beans
1 medium Onion, diced
2 small-medium potatoes, diced
Granulated garlic
Salt & Pepper
Worcestershire Sauce

*Optional
1-2 cups of Liquid (water or stock)
8oz. Elbow Macaroni


Instructions:
1. Cook ground beef and onions in a large pot over medium heat until beef is thoroughly browned. Drain and return to pot.
2. Add cans of tomatoes, peas, corn, lima beans, carrots, and green beans to pot with their liquids. Add diced potatoes along with granulated garlic, salt, and pepper to taste. Stir.
3. Bring soup to boil and cook for 10 minutes until hot through.
*4. Optional portion - Add liquid (water or stock) and macaroni. Bring soup back to a boil and cook until macaroni cooked through.
5. Add 2-3 shakes of Worcestershire sauce to soup. Stir. Serve.


This is a totally flexible soup that you could add or subtract from. I have to admit that I'm not a big fan of cooked carrots or of lima beans, but when I left them out; the soup just wasn't right. So, I do add them, but I use small cans of them. Of course, since you've never had it, it would probably taste just fine to you if you left out any of these ingredients.  But, since I grew up on this soup, it didn't taste like home without ALL the vegetables. I hope you enjoy this as much as we do

What's your favorite comfort food when it starts to get cold outside?

Stay Busy While Waiting for Inspiration (& Giveaway Winner)

Ever get that restless, need-to-do something NOW feeling but you just can’t bear to deal with your usual tools and supplies or you just are not feeling inspired by what's in front of you? I've made this quick list of a dozen ways you as an artist or creative-type can still busy yourself when your muse has left you stranded. 


1. Sort through old work: Take a good hard look at some of your previous works of art. What worked? What didn’t? Make notes. Take apart and/or repurpose what's just not working for you. 
2. Organize supplies: I imagine we all have a hoard of supplies and materials that are piled up or stashed away awkwardly. Or, there are those tools that are never within arms reach when you need them. Re-think and reorganize the layout or storage of your stash.
3. Clean your studio: Busy yourself with the mundane task of sweeping, wiping, sorting, and generally cleaning your creative space. Just being in there may spark that inspiration.
4. Clean your house: Sometimes your studio may feel too confining. Expand the cleaning frenzy to your living space. The mundaneness of chores will have you back in the studio in no time (at least that's the case for me.)
5. Go shopping: Even if it's window shopping online or in a brick and mortar store, take a look at what current trends and styles are out there or what new art materials are on the market. What calls out to you? What can you do better? And, getting out of your own headspace is always good. 
6. Explore social media: Blogs, Pinterest, Facebook, and Instagram are not only full of eye-candy but behind all of that is real people.Take a moment to see what others are up to, lean on them for support, read about their struggles, share your own ideas and lack of motivation, find your tribe. Remember, it's SOCIAL media.


7. Go outside: Work in the garden. Go for a walk. Just take in a breath of fresh air. There's so much to absorb and take your mind off being stuck. From cloud patterns in the sky to leaves growing haphazardly to the breeze blowing across your face, let yourself be consumed with the beauty outside your door. You'll find interesting color combinations and patterns and contrasts that will help renew your creative spirit.
8. Read: Lose yourself in another world, another time, another place so when you come back to your table your view is a little different. However, if fiction's not your thing, a creative book or magazine may be all the break you need.
9. Exercise: There are those who SWEAR by the endorphin release that exercising gives you. I have to admit that I'm not really an exercise person. Though, I do enjoy stretching out the muscles from time to time.  Exercising, in general, is a good way to really focus on one thing and get your mind off the block. It's hard to think about making art when you're sweating your butt off (literally).
10. Create outside your area of expertise: If you make jewelry, try painting a little. If you paint, maybe sew something. If you sew, try knitting. And, so on and so forth.  Getting out of your comfort zone stretches those creative muscles so you can think more fluidly about your work. 
11. Do creative prepwork: Stay busy at your desk preparing for when you get that stroke of inspiration. As a jewelry designer, this can include making ear wires and clasps, aging wire, texturing or etching metal. For a painter, this might be building and gesso-ing canvases. Get yourself ready to be manic about creating.
12. Learn something new: Watch a video tutorial. Hone your photography skills. Take a class. Learning something new might shine a light on how you normally work or might help you incorporate something new into your process. Or, it just may give you a new outlet. 


Those are just some of the ways I like to stay busy when I'm in a creative rut. What are your tricks?

Now, for the GIVEAWAY winner! Using a random number generator, the winner is:
Congratulations! I'll be in touch with you.
Thank you to all of you who came by wishing me a happy blogiversary and who entered the giveaway. It was the perfect way to commemorate the occasion. 

A Peek at My Week | Oct. 29 - Nov. 4

I take way more pictures than I share on here or other social media sites. What's the point of having all those pictures if I'm not sharing them with anyone? So, here's a peek at some of what happened in my week (please note that some of the pictures were shared...somewhere.)

Sunday included a silly, silly Zoe who needed many belly rubs.

I discovered that the farm behind our property was growing cotton this year and couldn't resist sneaking out there for a few pictures.

Monday started with work on pulling these components together into a necklace.

And, it doesn't have to be Tuesday to have tacos! They're still delicious.

It was Tuesday when the hue of the paint water caught my eye. I don't even remember what I had painted, but that blue is absolutely dreamy.

While out in the yard taking care of a few things, I spotted beans growing on our trellis. I had long given up on the beanstalks yielding anything. They had browned and withered to almost nothing. Since it was Halloween morning, we dubbed these "Zombie Beans".

Knowing I would be at my mom's house for most of Wednesday, I made sure to take plenty to do with me. While waiting for a video to upload, I finished this necklace.

I was also able to get a few things added to the Etsy shop during the course of the week. 

Thursday was spent working on the video/blog post for the fifth installment of my Jewelry-Making for Beginners series. 

Once that was done, my focus went back to my own jewelry making. I become mesmerized by the color flashes in some labradorite beads. They're so pretty!

After dinner, I had a cookie craving. My old standby recipe for chocolate chip coconut oatmeal cookies came in handy. I hope to share that recipe very soon!

I spent almost all of Friday working on organizing my twitter (don't ask). That evening, I enjoyed watching my nieces march in the band at their last regular season football game. Since they won this game, their team is going into the playoffs! And yeah, I was too busy watching the band to actually get a picture of them (oops!)

The hubby's been sick for WEEKS so Saturday was very low key, mostly spent watching college football (ROLL TIDE!) and recovering. Oh, and there was plenty of puppy snuggling of course!

That was my week for the most part. There were a few hiccups, but in pictures, it's a lot less frustrating. How was your week? What were the highlights for you?

The 100 Day Project 2024

Yesterday, the 100 Day Project for 2024 started (it's not too late to join in!!) I mentioned last week that I would give you a heads-up ...