Reveal for SJ Honey Do List Jan 2022 (and UV Resin Tutorial)

 It's a new year full of new challenges in so many ways. Right now, I'm finding it challenging to stand upright (but that's my own fault for falling down.) As I heal, I'm looking for ways to stay creative and inspired. This is the seventh year that Sarajo and her husband, Eric, are offering up monthly photo inspiration on her blog and calling it "The Honey Do List". Though this month's inspiration photo is full of pinks (not my usual color), I am absolutely thrilled with what I created!

I even have a whole tutorial for this necklace at the bottom of this post and a few other designs, but let's talk a bit more about the challenge first. 

Here's the photo inspiration from Eric and Sarajo.

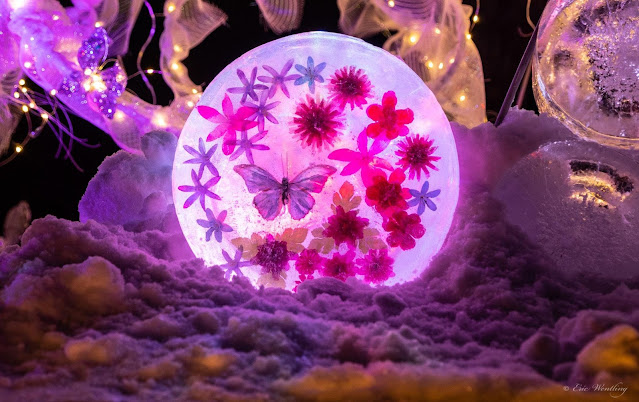
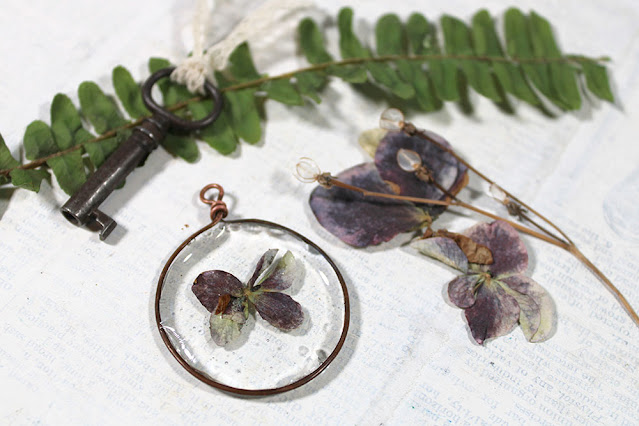
See what I mean about the pink? But, the dried flowers and the butterfly stuck in my brain. When I was sorting through a few things from my craft room, I stumbled upon a dried hydrangea flower that just happened to resemble a butterfly. I knew I HAD to feature it for this challenge. And, an idea bloomed.

I wanted to suspend the petals in resin within a wireframe. Though I hadn't tried this technique with UV resin before, I have done something similar with other resin. And, it was worth a shot. I'll never learn anything new if I don't take risks now and again. Besides, I already had a couple pairs of earrings that would work for this reveal too. 

Oh, the earrings! While laid up in bed, I've been consuming loads of video content - as mentioned in my last post. One of the jewelry-making YouTube Channels that I've been loving has been Halcraft USA. Denise Yezbak Moore creates most of their content and has some really beautiful and unique designs. I created two of them IN PINK! This first one is based on her Wandering Sky Earrings (I also shared them in the last post.)

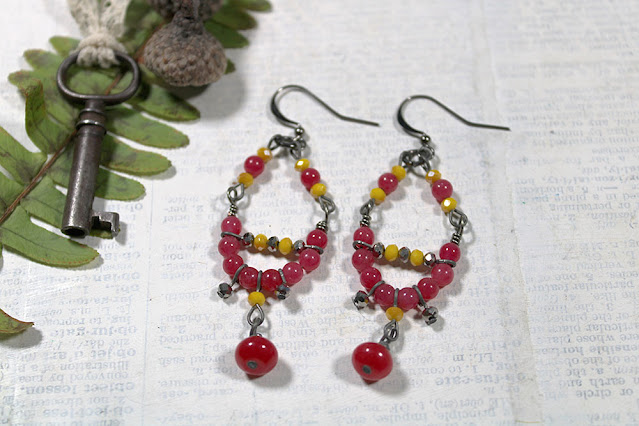
From there, I watched her Moonstone Magic Earrings tutorial and made this pair of my own earrings in varying shades of pink.
I think both of these earring pairs work really perfectly with the Honey Do List inspiration and just had to share them with you. 

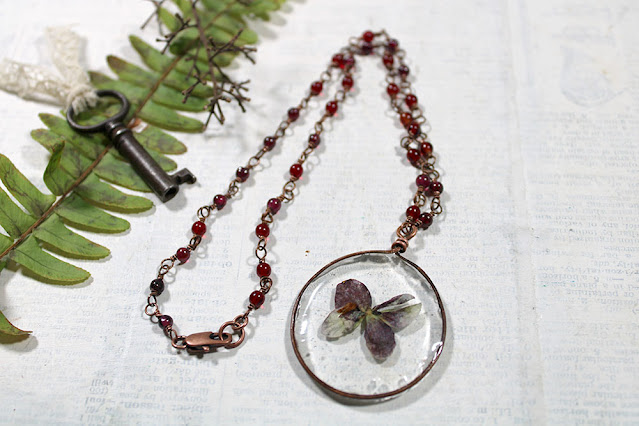
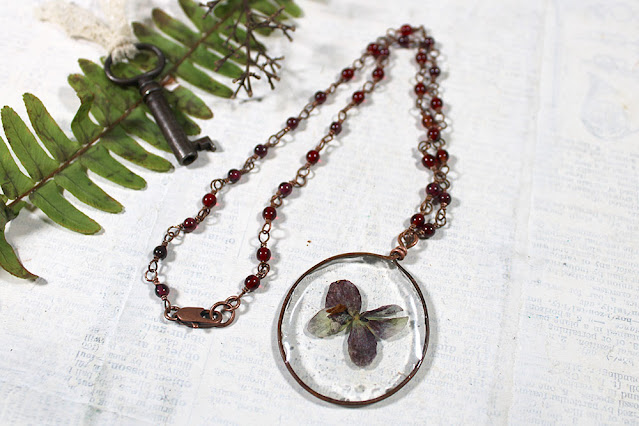
But, back to the real star of the show. 

Since I've been watching so many videos, I was ready to make some of my own again. So, I created one for this UV Resin and Wire Pendant

But, if you don't have time to watch, the instructions are fairly simple.
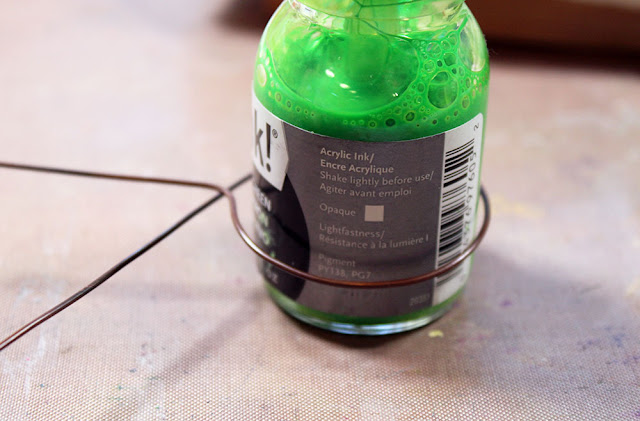
Begin by creating a frame with some thick-gauge wire. My antiqued copper wire was 18 gauge. Wrap your wire around a sturdy, round item that is as big as you need for whatever you're going to seal in the resin. I found that a glass acrylic ink jar was perfect for my flower. 

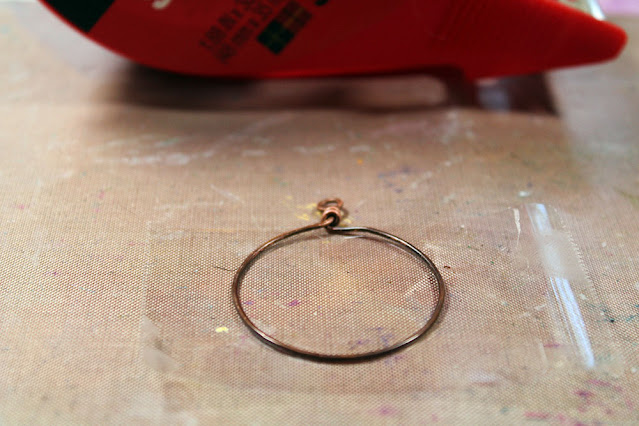
While wrapped around your template, bend the shorter end of the wire up. Then, use the longer end to create a wrap around the short tail. Trim the excess from the long tail and create a loop with the short tail. Hammer both sides of your wire circle flat, and press a strip of packing tape firmly on one side.

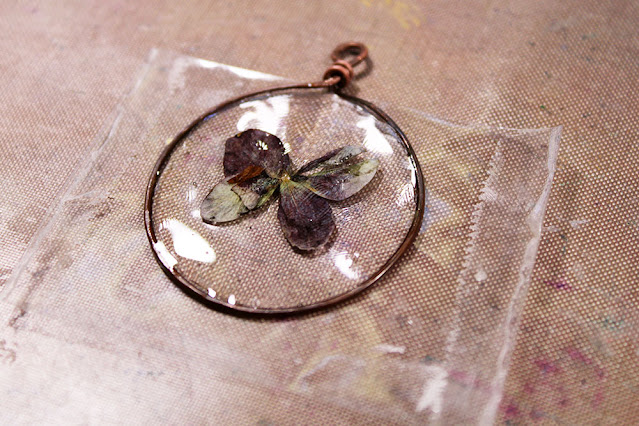
Add a thin layer of the UV Resin inside the entirety of your frame and cure it in a UV lamp. Place a dollop of your resin in the center of the frame then add your focal (flower) on top. Cure the resin so your focal is "glued" in the frame. 

Spread resin over the focal and within the whole frame to seal everything. Cure in the lamp. Repeat layers of resin and curing until you're happy with it.

Carefully peel off the packing tape from the back of your pendant. Add a layer of resin to the back and cure. Again, repeat layering the resin and curing until you are happy with it. 

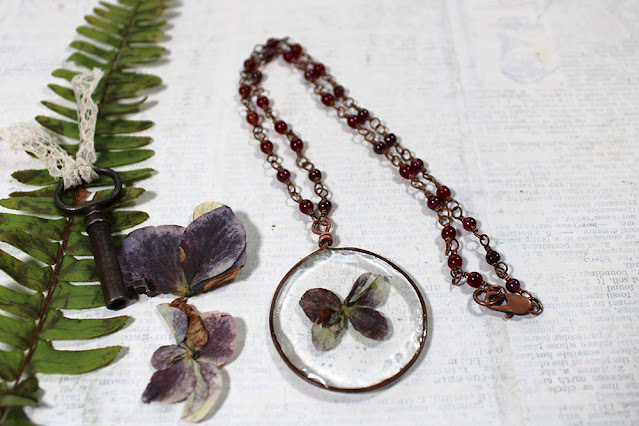
And, with that, you have a dried flower pendant with a handmade wire frame. You just need to add a chain to complete your necklace. I chose to use small garnet beads and 24 gauge wire.
It works out great since garnets are January's birthstone.

As always, I give mad props to Sarajo and Eric for this inspiration. I don't believe I would have come up with this project if it hadn't been for them. And, I'm certain that this is one of my most favorite things I've ever made. So, BIG THANKS. 

Make sure you head over to SJ Designs Jewelry to see what Sarajo created from the inspiration as well as if any other artists found this as inspiring as I did. And, if you're inspired by the inspiration photo too, Sarajo will have the link open for several weeks so you can participate also!

Oh, and have you tried UV Resin yet?

You Can't Keep a Crafter Down (How I've kept busy)

It's probably about time for a bit of an update. After two surgeries on my ankle, I'm on the mend now. However, I'm still sitting in bed with my leg up most of the time. As such, my view doesn't really change except for how I occupy myself. As such, I thought it might be helpful or interesting to share exactly how I've kept myself busy. 

One of the first things I dove into was my Bead Box. Since most everything was gathered, I just needed some wire, pliers, and a bead mat.


I think I mentioned it in the linked post, but I FLEW through that box in just a couple of days.

From there, Pat helped me gather some art journaling supplies in a small basket.

I played around with watercolors and got carried away with painting flowers.

Oh, and The Ugly Art Club had their five-minute challenge at the end of December, and that gave me something to do for five minutes each of those days!

I've been doodling like a madwoman, filling page upon page of a notebook with faces.

And, there have been neurographic doodles.

I even created a mark-making catalog to document different types of doodles.

While doing many of these tasks, I've watched SO MANY VIDEOS. Throughout most of December, I was obsessed with Vlogmas videos. If you don't know, vlogs are basically video blogs and Vlogmas is daily vlogs that run from December 1st through about Christmas. I watched so many that now I'm actually considering starting to vlog when I'm back on my feet. What do you think of that? 

Once Vlogmas ended, I began exploring all my subscriptions and re-discovered that Michael's craft stores have online Zoom classes. I began with a bead weaving class
(I actually can't remember if I took this class or just watched the replay on YouTube. Either way, it was great!)

I've been enjoying learning to crochet.
I actually tried to learn to knit at the beginning of this whole ordeal but was learning from a book. Though the motions felt right, my results looked wonky. I'll try knitting again in February with one of these online classes. 

And, I've made adjustable bracelets

I've also taken part in a few of Michael's business-related classes. For the most part, they put the classes up on their YouTube Channel within 24-48 hours of the class airing. (The exception is their premium classes.) I've saved a whole list of older classes from them that I want to watch. 

I've also been enjoying the Halcraft Collection videos from Denise Yezbak Moore. I made the below earrings inspired by her Wandering Sky Earring tutorial

Some of my own jewelry designs have even been made. I happened to have a tray of pendants and prepped tin pieces stashed in the craft room that have sparked a few jewelry pieces. And, I'm now able to get in the craft room for a few minutes at a time to dig through the bead cabinet if I absolutely need to.

Last week, Pat set up a folding table in our empty guest room (our niece moved out around Christmas) so that I could craft and record while seated in a wheelchair for short stints. My regular craft room is too cramped and the desk there is a tall one - not conducive to my current situation. So, this works a bit better right now.

One of the first things I did in the temporary space was to create a Stamped Shrink Plastic Charm tutorial

And, I've found that the new space is okay for taking pictures of all the jewelry I've made over the past month and a half. Now I've begun editing those pictures. 

Oh, and there have been loads of kitten snuggles. 
Artemis LOVES that I'm in the bed most of the time so she can come to steal my warmth whenever she wants. In fact, she's dozing in my lap as I write this.

And, that about sums up my last two months.
What have YOU been up to?

Bead Box 14 - Stocked

I have to thank my lucky stars that I was proactive enough to restock and photograph my Bead Box before I took the tumble that broke my ankle. The Bead Box is simply a basic 17-compartment plastic organizer in which I place the components for designs to be made later when I travel or my inspiration wanes. This is the fourteenth version of this box. 


Let me admit that this box came in handy to keep me busy for a few days after my first surgery. I flew through it and now have to figure out how to photograph each of the finished pieces. For now, let me share what was included in this box. 

This first design is actually a custom order from an Instagram friend. She saw my collection of soldered pieces and this one called out to her with a fairly specific necklace design. I threw these bits in the box to get me started.

Another soldered pendant, an experiment in wire and tin, just needed a few beads (and a button) to transform it into a necklace. 

These beautiful tin shapes will be accented simply with a few metallic glass beads and eye pins to make a pair of earrings.

You may recognize some of these elements from the previous bead box. I took my failed attempt at a bracelet apart and added a few more blue beads to the mix. This bracelet design should come together easily.

It was almost silly to put these pieces in the Bead Box. It will take only seconds to join the tin to the unfinished brass pieces for a pair of earrings. 

Just before I assembled the pieces for this box, I received several packages of new metal components. These ovals were some of the new bits. I'll join them together with the pink glass beads to make a bracelet.

Like the previous picture, these beads and brass pieces will come together in a bracelet design. This one will be quite dainty.

I always love these brass skeleton leaves and bought two sizes of them online this time around. I'll pair these simply with some Czech glass beads for earrings. 

As I was sorting through my soldered pieces, this bubble jumped out as something perfect as a gift for my teenage niece, Grace. I've selected frosted clear beads and opaque black crystals to make the chain of a simple necklace. 

This mermaid bottle makes me smile. I decided to add just a few cut glass beads and will also add a length of chain to transform it into a necklace. 

I love these raw brass sun charms from Patina Queen. To really make them shine, I'll add crystal beads and turn them into earrings.

In my stash, I found a little bowl of bead and charm pairs for earrings. I pulled together the two sets of copper charms and faceted frosted glass beads and will create earrings with them. 

All of the main components here were things I received in a giveaway from Erin Prais-Hintz. I'll combine them into a pair of earrings. 

More charms from Patina Queen and dark blue faceted glass beads will become a stunning pair of earrings. 

I must be on a celestial kick right now because this little tin pair called out to me. I've got some mismatched glass bicones to give the eventual earrings a little weight. 

This is probably my favorite design in the box. One of the raw brass moons was connected to a soldered bubble with the word "light" in it to create a "Moonlight" pendant. Black and gold glass beads have been selected to create the chain for this necklace. 

This final design is a simple stacked earring one featuring AB crystal beads and silver findings. 


Thrifty Thursday - December Thrifty Haul

A few days before I took a tumble and broke my ankle, I actually got in a little thrifting. Two local antique stores had their monthly estate sales that I was able to visit. Just take a look at some of my scores!


For a better reveal at ALL the treasures I brought home, you can watch my December Thrifty Haul video here or on YouTube. 


So, did you find anything good in December, or were you more focused on the holidays? 

Mixed Media Art Videos in December

Let's just say that December was a bit of a slower month for me for so many reasons (breaking my ankle and the holidays are at the top of the list!) So, you probably haven't missed many of the videos on my YouTube Channel, but I feel compelled to share them here...just in case!

Ranger Mystery Box Reveal and Play


Easy DIY Ornament - You, Me, Same 3

Just Keep Swimming - Mixed Media Spread

I'd really love to be able to tell you that there's much more content coming soon, but I can't promise anything at the moment. I'm itching to make more. And, I'm planning to make more. There are lists and everything! Until I gain a bit more independence, all of that will remain in the planning stages. But, it's coming...one day! Thanks for hanging in there with me.

The 100 Day Project 2024

Yesterday, the 100 Day Project for 2024 started (it's not too late to join in!!) I mentioned last week that I would give you a heads-up ...