Happy Dance Challenge Shabby Bangle Reveal

When I shared some of the Challenges and Inspirations for May, I included the one for Artisans Create Together Facebook Group. However, I have to admit that I wasn't planning on working on it. Once I studied the inspiration collage though, my muse wouldn't be silent. 

The bright pops of color and boho style reflected in the collage really spoke to me. I knew I had to create a shabby bracelet. Here's a look at the original collage. 

It was the pinks and blues that first stood out to me along with the stitching. I made sure to include both. 


The base of the bracelet is an old plastic bangle that I wrapped with lace, recycled sari silk, embroidery floss, and ric-rak. Once I secured the fibers by tying them, I began to add beads and stitching. 


I sewed on a bead soup of miscellaneous small beads and added small stitch patterns with more embroidery floss.


I really adore the patchwork-like feel of the whole thing. Once again, I was reminded that the jewelry challenges and prompts that I find really can give loads of inspiration if I just give them a chance to marinate. 

Check out what the other participants created for this challenge in the May 2018 Challenge Album.

Did you participate in any challenges this month?

Peek at My Week | May 20-26

At the end of each week, I like to show a quick round-up of what's been going on in my corner of the world. Some of this includes what I've previously shared on social media, some of it was simply stowed away on my camera roll. As an addition to this weekly review, I'm going to start adding a few inspiring, funny, or interesting links that I found during the week at the end of the post. Let me know what you think of the addition. 

Over the week, I worked with altering leather for The 100 Day Project
48: This first piece proved to be a real test of my patience. I originally was going to do the cuff I made on day 51, but the snaps I had weren't right, so I had to use another piece of leather. I was happy to have learned to add snaps to leather at least. From there, I wanted to add the Tim Holtz tag, but riveting it on took me MUUUUUUUUUUCH longer than I had anticipated. I was determined though and finally successful! And, I really like it too. It's a shame I've since lost it in the craft room. Seriously, I've been searching for it all week. It's just...gone.
49: A belt that's been in my stash forever was the base for these earrings. I think cutting out the shapes so they somewhat matched was the hardest part. 
50: This was the other leather belt I have on hand. I used the embossed tin piece I made for day 19, using eyelets to rivet it to the leather. 
51: I was able to pick up the right size snaps for that leather belt and quickly add them to make it a cuff. It needs some finishing touches, and I need to work on where to position the snaps, but I totally dig this upcycle. 
52: I awoke with a design similar to this result in my head. It was just a matter of executing the use of leather, eyelets, and beads to get the desired result.
53: This project should have been a snap to make. But, I learned that I really should think through designs before adding permanent glue. It came out fine in the end.
54: My beading friend, Divya of Jewels of Sayuri, shared a great tutorial that included leather and ribbon crimps. She totally inspired me to do something similar.

As for the rest of the week...
Sunday was completely consumed with making that bracelet. I used ALL THE TOOLS to try to get it to work. 

Monday was a full day that started with some gardenia admiration. Y'all! I can't get enough of these.

Leeloo was up to her own antics...yup - that's toilet paper pulled from the master bath, through our bedroom, and into the craft room. Yay! It wasn't near as fun to roll it back up.

Luckily, I was able to recover by having lunch with a friend. We almost completely devoured these fried pork skins and queso at Dragonfly Foodbar. Don't judge - they were SO GOOD!!

On Tuesday I got to feel super old as my oldest niece received her class ring, signifying her becoming a senior in high school. Super old.

On Wednesday, I admired the gardenias again as they were gloriously still dripping from a rain shower.

There were other flowers to admire this week as well. The zinnias I planted forever ago have finally begun blooming. Now to wait for the sunflowers and see if the daisies ever show up.

We had a ton of wildlife visitors this week. I found a baby Scarlet King Snake just under the lid of the pool skimmer. He startled me, but he's a "good snake" and not dangerous at all. We've had bunnies in the yard all week. They're so skittish, this was the best photo I could get of them. And, yesterday these baby armadillos emerged from under the porch. (I had an inkling that there were babies about.) Seriously y'all, it's the armadillos that are the biggest nuisance of these three. While they are great at eating the ants, they leave holes all over the yard. And, I'm prone to tripping in those holes. We're going to have to do more catch and release. 

It's a three-day weekend here in the States for Memorial Day. Here in South Alabama, we're waiting for Tropical Storm Alberto and expecting wet conditions all weekend long. During one of the showers yesterday, I pulled out my newest supplies to try more acrylic paint pouring on my own. I went with a dirty pour method. The above canvases are still wet in the photo, but I'm absolutely loving the process. You can bet I'll be sharing more about it later as I experiment and learn.

As for the links I promised, 


That's the week for me. We actually have a reprieve from the storms for a while today, so I'm hoping to have a bit of outside time. But first, to figure out what my altering focus for the week will be. Hmmmm..... Any suggestions?

How's your week been?

DIY Washi Tape Earrings

There's something absolutely irresistible about Washi Tape. I'm not sure if its inexpensiveness, its ease of use, its plethora of varieties, its versatility, or if it's something else entirely. It's hard to keep yourself from picking up a roll or two when they catch your eye. But how to use it all? I don't have an answer of how to use it ALL, but making a pair or two of these simple earrings is a start!


The materials are simple:
2 Wood tags
Acrylic paint
Paintbrush
Washi Tape
Bone folder
Scissors
T-pin 
Mod Podge (or another sealer)
Dimensional Glaze 
4 Jump rings
2 Ear wires


Begin by painting the front, back, and sides of your wood tags. This could take several layers, depending on the paint/color. I like these tags because the holes are already drilled in them, making this project even easier. Also, keep in mind that some washi tape has transparent areas so whatever your background color is may show through. 

Once the paint is dry, place your tags side by side evenly. Apply your first strip of Washi Tape to both tags at once, beginning in the center of the tags. Stick the excess tape down on your work surface to keep it from moving around. Use a bone folder (or another tool for rubbing) to secure the tape to the tags. 

Repeat this process until you have covered your tags with the tape. 

Carefully cut between the two tags. Avoid getting too close to the edge of either tag.

Carefully peel the tags from your surface and turn them over to keep them from sticking back to your surface. 

Trim off the excess tape, and make sure to rub over the tag again, paying special attention to securing the edges. 

If you want to make your earrings double-sided, this is the point where I would begin to repeat the previous steps. 

Use a t-pin to poke through the original holes in the tags.

Paint a thin layer of Mod Podge over the front and sides of the tag. Let it dry completely.

Top the tags evenly with a dimensional glaze (diamond glaze, dimensional magic, glossy accents, resin, etc.). Make sure to avoid the open holes. Allow it to cure. 

Seal the back with Mod Podge. (If you made this double-sided, you will want to also add the dimensional glaze.)

Once your tags are completely dry on both sides, attach the ear wires with jump rings. I used two jump rings on each tag to help ensure that the patterns face forward while hanging.  Use my tutorial on opening and closing jump rings if you are unsure how to do this. 

And, just like that - you have a pair of fun, handmade earrings!

The colors in this example pair feel very spring/summery to me; but with the variety of Washi Tape out there, you can make jewelry for any season, holiday, event, emotion, or personality!

Just imagine the possibilities!

I'm linking up at the Friday Frenzy Food and Crafty Link PartySweet Inspiration Link Party, and Saturday Sharefest at The Sway

Catching Up (SJ Honey Do Challenge and Peek at my Week)

I've been trying to keep a blog calendar of dates on which to blog and their topics. It worked pretty great at the beginning, but lately, I haven't been able to keep up. It may have something to do with it being warm enough to get in the pool...maybe. In any case, Here's a couple of the topics in one post: two weeks worth of peeks at my week and my reveal for SJ Designs Jewelry's Honey Do List for May. I'll start with the easier of the two. 

Sarajo's husband, Eric, sets forth a challenge for her each month in the form of a picture for inspiration. This month, he chose a photo he took while they were in the Denver/Boulder area of a large rock formation. I have to admit that I'm not sure exactly what it was - a mountain, a cliff, some kind of rock wall. I don't know. I do know that while I wasn't initially inspired by the photo, a little thought about it reminded me of a collection of beads and charms that I had paired together and stashed away to work on at another time. Once I finally located the baggie, it took very little time to pull the necklace together. 
The pendant is consists of a darkened steel ring that I made by smashing and riveting two ends of a piece of wire together. From it hang two charms from Petra of Scorched Earth and a small key. (The spike charm has lovely layers that remind me of rock layers.) Above the ring is a Gaea bead. And, the front of the necklace is made of brown and white dyed agate beads with antiqued brass chain at the back. I really think it works perfectly for the challenge. Isn't it weird that I had pulled all this together and just put it aside? It's like I was waiting for this particular inspiration. Thank you to Eric and Sarajo! Make sure to head to SJ Designs Jewelry to see the inspiration picture and what Sarajo and other designers created with it in mind. 

Now, as quick a rundown as I can give of two weeks. 

First up is May 6-12:
For #The100DayProject this week, I focused on altering fabric and lace.
34: I used one of my paint rags and a couple of brass eyelets while at the art retreat to make a simple pair of earrings. 
35: Thin, vintage lace was combined with fold-over crimps and beads to also create earrings. I colored the silver-tone crimps with Vintaj patina for a more aged look. 
36: We eco-dyed fabric and paper while at the art retreat. I cut a small circle of my fabric, sewed on a button, added eyelets, and hung a charm I created with a small shell and resin in a bezel. 
37: Since I'm usually away from home on Wednesdays, you can count on those projects likely being super simple. This was the case here. I simply cut a length of ribbon lace to which I added ribbon crimps (like I do in the velvet bookmark video). From there, it was simply a matter of adding a clasp and a little chain to make the bracelet adjustable. 
38: Using more of the eco-dyed cloth, I cut/tore it into strips and wrapped it in a bead cap to make a quick tassel.
39: I thought I could cut shapes out of lace and make something fabulous. However, I have to admit that I really struggled with this one. And, I'm not sure I like the results either. 
40: This was my favorite of the bunch! I ripped a rectangle from an old tablecloth, bunched it up, and sewed down the edges. I thought I was just going to end up with a simple, wrinkled rectangle. However, in the bunching and sewing, it curved. I was devastated at first but quickly saw the possibilities. So, I added a few more lines of stitching and several mother-of-pearl buttons. Then, tube rivets were added to hang it. I couldn't stop there so the whole necklace was completed with a few more buttons and copper chain.

Sunday was our last full of Art at the Beach 2018. We went to brunch at The Ruby Slipper Cafe in Orange Beach. And, I'm sharing my meal because I overcame my "fear" of eggs Benedict by ordering and devouring two of their specialty versions. So good!

Later on Sunday, we took a quick jaunt to the beach. I snapped this photo of everyone (even my own shadow!)

Back at home on Monday, I was reminded how much I was missed. 

Throughout the week, I had loads of natural surprises to take in and enjoy!

And, I even got a little busy-work done as I aged and sealed wire for later use. 

The following week (last week) was May 13-19.
This week, I altered all the pieces from a set of fancy metal paper clips. All of them were hole-punched in the end for ease of use in jewelry.
41: These were altered with a texture hammer and aged with Novacan black.
42: It took a few tries to figure out how to use the Lisa Pavelka waterslide transfers that I've had on hand for ages. Once the slide was finally on and sealed to the clip, I simply added bead dangles. 
43: The clip was run through an embossing machine to texture it. It was then colored with Vintaj patina. From there, I tried adding beads. It was a struggle as I don't think I used the right materials (thread may have worked better than wire). I'm not completely unhappy with the results, but I had envisioned something a little better. 
44: The center of the clips were altered with a metal stamp with a flower on it. My metal stamping game is pretty low. However, I persisted, adding ebony rub-n-buff to accent the flowers. A few beads were added to hang from the bottom.
45: My disc cutter is still one of my most favorite Christmas gifts ever. I tested its skill and my own by punching a circle from one of the clips and then hanging it from the bottom. I really love the geometric nature of it.
46: Not sure if I could emboss Iced Enamels onto the clips, I gave it a go. And, it worked. To add a little more color, beads were wrapped right onto the clips rather than hanging from them. 
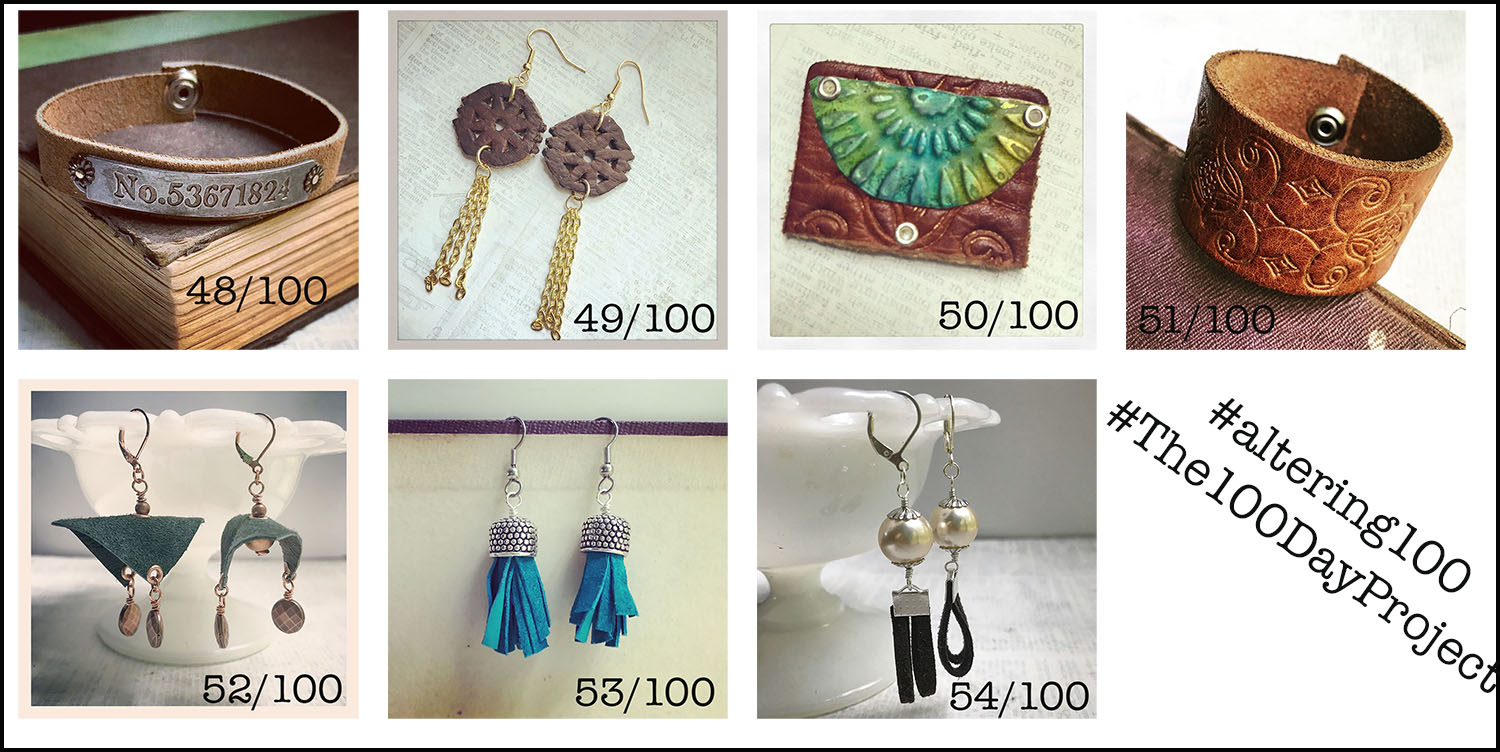
47: Running behind and short on time, I simply stamped Staz-On ink onto the front and back of the clip. 

Sunday was Mother's Day, and I was able to visit with my mom and grandmother for a few hours. (The rose was to my mom from my step-dad - sweet!)

Pat spotted this gorgeous sky and called for me to come see. It was weird because it wasn't quite time for the sun to set, and the sun was at my back and not where the light in the clouds is. Still, super cool. 

I finally dove back into my art journal after the retreat. The background of this page was where I had stopped when I started packing up. It gave me a nice starting point when I got home. 

I am more partial to this page that was also completed last week. 

We have a few blueberry bushes. I was quite happy to find that the berries are finally beginning to ripen.  

I spent two days chauffeuring family members to doctor appointments - so that was...fun.

I was happy to end those two days with a girls' night flow painting get-together. It was so much fun! My paintings are at the bottom center. I'll try to take some more pictures of them now that they're home and dry. 

We finished out the week by letting one of our teenage nieces have a few friends over for a swim party. And, then we went out for margaritas to recover from the teenagers!

It feels like the weeks are flying by faster than I can savor them. How do you make sure you relish the moments?

Fairy Altered Playing Cards (ATCs)

I promise I'm still making jewelry, but as of late, my focus has seemed to be on art journaling and other paper-related arts. I think that has loads to do with preparing for and attending Art at the Beach 2018. And, creating in one art form often leads to inspiring me in another. Before even packing for the art retreat, I decided to "warm up" by participating in a swap. The parameters of it were to create three motivational cards (playing card/Artist Trading Card size) with a fairy theme to send to a partner. I made these.

I kinda love them! And, I'm pretty proud that I thought to record my process to share with you.

For all three cards, I started with basic playing cards that I painted with a coat or two of gesso as a base.

For my first card, this cutie on a swing, I stamped the Stampendous fairy image onto a piece of cardstock with embossing ink, covered it in a gold-sparkle embossing powder, and heated the image. I colored the fairy with Inktense Watercolor Pencils and a water brush before shading the background with Neocolor ii crayons and blending them with a wet paintbrush. I adhered the cardstock to the playing card, cutting off the excess. A phrase from one of Tim Holtz's sticker books was added. I went around the phrase with a black pen and inked around the card to finish it.

For the background of the second card, I used one of my own gelli prints, simply gluing it to the playing card. I photocopied an image of a girl in a ball gown from an old yearbook as my focal. To make her a fairy, I stamped petal images from EK Success' Inkadinkado stamps onto cardstock and cut them out. Her skirt was created from paper flowers that were folded and glued together. I stuck the wings on the girl, the girl on the card, and the skirt on the girl - in that order. Sparkles were added with aqua Stickles. Again, a phrase from Tim Holtz was used. The card was framed with a line from a Stabilo all-pencil and water.

To begin the last card, I colored directly onto the card with Brea Reese Glitter Inks in a pink, yellow, and blue. The colors were blended together with a little water. Basic black acrylic paint and the lid of a dishwasher liquid bottle were used to create the circles. The lady image and wings (more Inkadinkado) were stamped onto cardstock, cut out, and colored with watercolors. The lady was glued to the cards then the wings to the lady. I went around the fairy with the Stabilo All Pencil before adding another Tim Holtz phrase.  The prase and card were accented with a Faber Castell Pitt Pen to finish it.

I'm really happy with how these came together. And, I do love me some fairies! I think my partner liked them too. Yay!!

If you have any questions about how I created these or anything else, please don't hesitate to let me know!

The 100 Day Project 2024

Yesterday, the 100 Day Project for 2024 started (it's not too late to join in!!) I mentioned last week that I would give you a heads-up ...