I can't even believe it's been over two years since Pat and I moved out here to our hidden oasis of Silverlox (what we've named the place). We've worked and worked on it, and there will always be more work to do, but we love it out here. Not much has been done to the inside of the house since the winter, but we're constantly working on the yard. CONSTANTLY!
As of late, we've been tackling the woods. It's been a dream of ours to have trails throughout the wooded area in the back of the property. It's about 2 1/2 acres or half the property, plenty of room for several connected trails. Not long ago, I discovered Pat out there hacking away at the undergrowth and making trails. I can't complain.
I've even helped clear out some of it. But, he really gets most of the credit for this latest project.
Above, you can see less undergrowth right in front of the golf cart as opposed to at the bottom of the picture. That's the area he had just cleared. The process is simple but tiring: trim any thick-ish saplings, move large branches and sticks out of the way, swing a sling blade across remaining plants to level them, and drive or trample over the area to mash it all down. We may eventually mow the area to smooth it down even more. But, for now...it's awesome just as it is!
We're really trying to use what looks like old trails to our advantage.
For now, there's one main trail that cuts from one side of the property to the other but has several entrances.
Eventually, there will be trails winding all through our Silverlox woods.
Here's one that's yet to be cleared, but you can clearly see that it used to be a trail. This makes it much easier to work on making these paths. However, not all the areas we want to have blazed are as clear cut as this one. We'll likely have to wait for the fall or winter when some of the growth dies back to clear those (and when it's not so stinkin' hot).
I know many of these pictures probably all look the same to you, so I did a pretty quick video tour of some of the cut trail to give you a clearer picture of how long it is and some of the sights.
I'm looking forward to using these wooded paths for walks, biking, and eventually disc golf!
They're fun to ride around in the golf cart too!
Our oasis is becoming more and more of what we had envisioned for ourselves and echoes more of who we are too.
When it comes to learning to make jewelry, it doesn't get more basic than the bead.
A bead is defined as "a small piece of glass, stone, or similar material, typically round and perforated for threading with others as a necklace or rosary or for sewing onto fabric." I personally tend to think of them as any material with one or more holes running through it.
I've been working my way through this basic jewelry-making series. Before getting into some of the skills needed to make jewelry, I feel that it's important to learn the tools and materials that are key to the skill. In previous posts (with corresponding videos) I've covered Jewelry Tools, Materials, and Findings. As well, there was a guest post from Divya that went over Cords, Ribbons, and Laces. Now, it's time to learn a little about beads.
I'm only covering the most basic of the basics as beads come in a vast array of materials, shapes, and sizes. I've also created a video with much of this bead basic information for your convenience.
As mentioned, beads, in general, come in a wide variety of materials: glass, stone, clay, resin, plastic, bone, wood, fabric, paper, metal, shell, and just about anything else you can find with or put a hole in it. In addition, the shapes are even more varied than the materials. Below is a review of the most basic of shapes because many times different bead suppliers use different terms for the shapes of their beads. I encourage you to explore different online bead shops and take a look at the shapes to see what appeals to you.
Seed Beads: Made of glass and tiny in size, these are most often used by artists who enjoy working on bead weaving, loom work, bead embroidery, and other techniques with much detail. Seed beads come in many shapes and sizes as well as a rainbow of colors.
E-beads: Belonging to the seed bead family, but slightly larger in size are e-beads. Like the smaller ones, they can be found in plenty of colors and finishes. Their holes do tend to be slightly larger than seed beads.
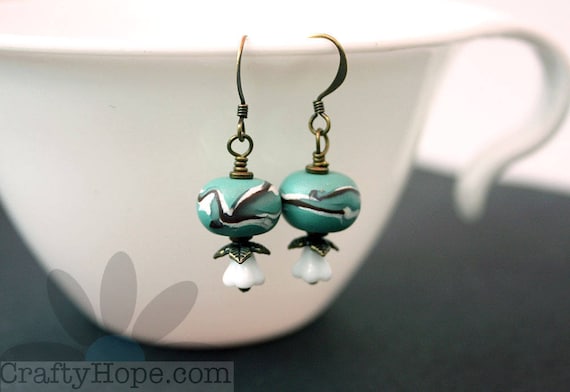
The beads along the bottom of the above picture are more specific in their shapes.
Round - simply a sphere, ball-like shape
Rondelle or Roundelle - I tend to think of these as smooshed/slightly flattened balls
Cube - much like a die, it's six sides of even squares
Tube - These might also be called cylinders or any other variety of names depending on the outer shape.
Bicone - what it would look like if you joined two cones together by their large circular bottoms (the opposite of an hourglass shape).
Briolette - These are often teardrop-shaped with a hole that extends across the thinner portion of the shape so that it hangs from its top.
Spacer Beads and Bead Caps tend to be metal elements that are used to accent and separate beads. However, I've seen them made of plastic and glass also.
Spacer Beads: Made of a flattened material with a hole through the middle that makes a space between one bead and the next. They can also be called spacers.
Bead Caps: These are concave (like a bowl or cup) with a hole in the middle and are intended to cradle one side of a bead.
The above elements are not necessarily considered beads but can fall in that general category.
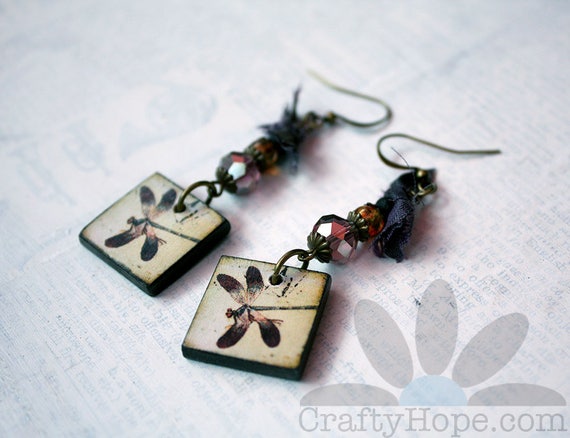
Charms: An accent piece that has a loop at the top so that they may hang. (Beads can be made into charms by forming a loop on them with wire. We'll cover that later.)
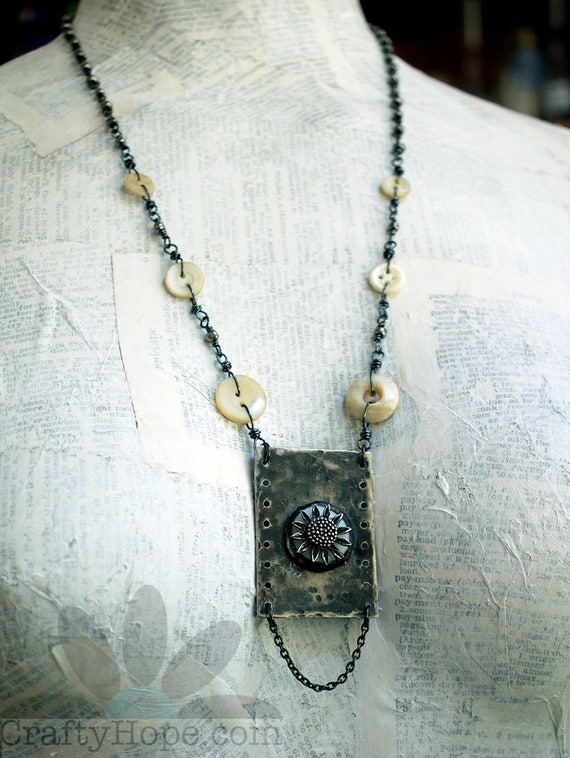
Focals: These are the centerpiece of your jewelry design and what draws your eye. They are the focal-piece of your design. They tend to be larger pieces. While all the ones pictured above are simply large charms, focals can be any kind of element.
Cabochons (Cabs): Materials with a flat-back that can be added to a design via gluing, wire-wrapping, or some other method. The key to recognizing these are that they don't have holes like beads or charms and are flat on at least one side. In looking for a more exact definition, I found that cabs made of gemstones are the ones with smooth/domed top surfaces rather than faceted (cut) faces. However, that's not the way I use the term nor the way I've found other artists to use it.
That about sums up some of the most key info I can give you about beads. As always, if you have anything to add, any questions, or any corrections; please don't hesitate to let me know!
Coming off vacation and trying to get back into a routine has been harder than I thought. I just can't seem to catch up enough to actually be creative. Instead, there's been a lot of cleaning, shopping, and taking family members to doctor appointments. But, there is finally new jewelry at the booth, in the Etsy shop, and being made. Here's a peek at it all!
That's the view of the shelves top to bottom. I definitely need to work on displaying the earrings a little better. I'm overloaded with them after #The100DayProject. And, I want to change the sign that's at the top of the booth (not pictured). Plus, I'm thinking of making that bottom shelf a "Discounted" or "Sale" section. In any case, I need to eke out time to focus on those projects.
I'm trying to add at least one listing to the shop each day. Though, I can't promise that that will happen. It's something.
Making jewelry seems to be the biggest hurdle for some reason. However, I did pull out some elements that have been lingering the craft room since OCTOBER(!!) and made progress with them.
These are the backs from watches I dissected for their parts and fronts. I couldn't bear to toss out the backs, especially since they resembled little bezels. Back in October, I had Pat drill holes into them for me. Once he returned them to me, I bagged them up and set them aside. Big mistake! In the picture above, I used jump rings to join them together so I could get a feel for how it looks as one piece.
From there, I pulled out my little drawer of flat back elements (cabochons, cabs) and came up with a pleasing design. I removed the jump rings before altering the insides with Iced Enamels. In the picture, I haven't adhered the cabs yet and was still deciding whether I liked the layout.
I've since made a little progress with this project and hope to finish it up today. I also hope that it inspires me to get my butt in gear and knock out some more jewelry. Ha!
So, that's what's going on in my jewelry world. What's new in yours?
I had fully intended to write a few blog posts while Pat and I enjoyed our two-week vacation. Somehow, though, that just didn't happen.
Instead, I spent many hours in and around the pool.
I crafted with my nieces.
One niece was seriously stuck on making slime. So, we made several versions. This was version #2 as she was mixing the ingredients (school glue and laundry detergent) together.
The other niece that stayed with us just wanted to make art. We each grabbed a canvas board and set to work. This was how mine turned out. She went in another direction altogether with acrylic paint, abstract bubbles, and splatters. I won't share without her permission, which I haven't asked for yet.
Pat and I spent lots of time outside doing yard work, working on the garden, and picking the wild grapes growing on the property.
I'm still giddy that those annoying grape vines are actually producing grapes.
Pat bought an old golf cart and got it working. He'll use any excuse to drive around the property on it. Boys!
The majority of the last week of our vacation was spent on one project in particular: QUILTING! I discovered the #BrooklynKnitFolkQAL video playlist when Lorelei Eurto showed off her completed quilt on Facebook. I was smitten! The videos are done by Jaclyn who goes through the steps simply and thoroughly. She made it look so easy! Learning to quilt has been on my bucket list for ages, and I've got loads of fabrics saved for when I learn to quilt. So, I took the break from most everything else to learn and do this. You can watch the videos for all the steps and supplies, but here are a few shots of some of the steps as I went through them.
Drying my fabrics after washing them. I used about three packs of fat quarters for the quilt top.
Cutting the fabric into 6x6 inch squares. This step was by far the longest and most tedious.
Sew the rows. I just loved this glimpse of all my rows stacked one on top of the other.
Pressing (ironing) the backs and attaching the rows to each other.
There were a few more steps in there before the final quilt came together. It's smaller than it looks here and is really just a lap quilt. But, it gave me a good idea of the process, materials, time, and cost it takes to make a quilt. It's much more than I had imagined.
And, while I had the sewing machine out, I made replacement bean bags (rice bags really) for our cornhole game.
Of course, I'm pretty sure I did other things than craft, swim, and garden...but I can't recall any of them at the moment. HA!
I also forgot to do the giveaway for Earrings 81-100. Oops! Before I get to that, I never heard back from the winner of the Earrings 61-80 giveaway. So, I've drawn again and the winner for that one is Kathy L!!! Kathy, I'll be contacting you about getting your prize to you shortly. Congratulations!!
Now for the 81-100 giveaway.
The names were collected
And a random number generated.
The winner is phinner!! Congratulations!! I'll also be emailing you about getting your prize to you.
Thanks to everyone who played along with these giveaways and offered up so much support during The 100 Day Project. I enjoyed stretching my creative muscles, and your encouragement really helped to make it fun as well. Thank You!
Now, here's hoping I can get back into a routine! How's your summer going? Do anything fun on your vacation?