Sweet Key Earrings Jewelry Tutorial

I love a mix of rustic and romantic and believe that my jewelry echoes that style. These key earrings not only use found objects, but ones with a little wear to them too. To add femininity, glass pearls and resin flowers were included in the design. Let me show you how to make some yourself.
DIY altered key earrings

Since I liked the bit of rusty wear on the small keys, I started the process by rubbing the keys down with Renaissance Wax.
This will help protect the keys and keep the current patina. Of course, Johnson Paste Wax would also work. Make sure to rub on the wax, let it sit for a minute, and then buff it off. Your keys are now sealed!

From there, I added the resin flowers using a dab of E6000.
Make sure to let the glue dry thoroughly before handling the keys.

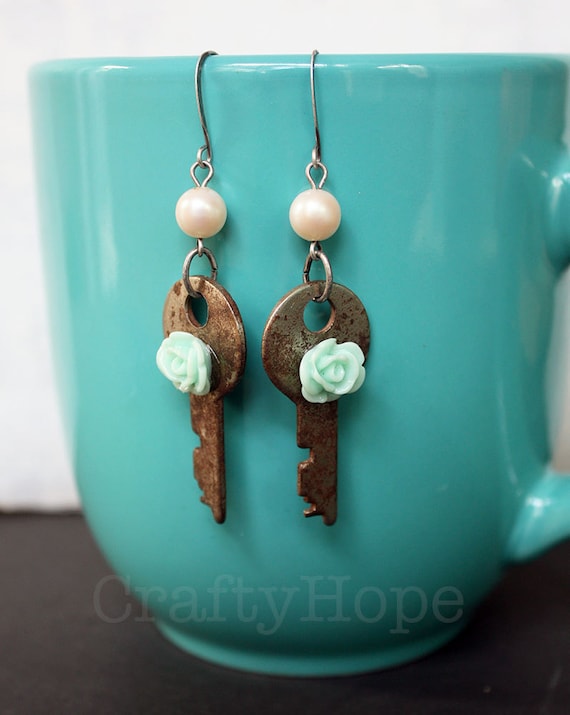
Once your flowers are secure on the keys, gather the rest of your jewelry-making supplies together.
In addition to the altered keys, I used two eye pins, two jump rings, two glass pearls, and ear wires. Use whatever metal works best for your design. I went with an antique silver tone. In addition, I also used wire cutters, round nose pliers, chain nose pliers, and bent nose pliers to complete the design.

Start by threading the pearls onto the eye pins. Bend the pins at a 90 degree angle just above the pearls. Trim the pins with the wire cutters, leaving just over about a quarter inch. Use the round nose pliers to roll the pins and form a loop.
There should now be a loop on either side of the pearls.

Use the chain nose and bent nose pliers to twist open your jump rings.
Always twist your jump rings apart to help ensure that you don't distort their shape and ability to close securely.

Slide one pearl connector and one altered key onto each jump ring, then close the rings by twisting them shut.

Finally, twist open the loop on the ear wires with the chain nose pliers and slip on the loop at the top of the pearls.
Before closing your loop, make sure that the flowers face forward when the earrings are hanging.

See how super easy these are?

Of course, if you're not up for making them. . . I do have these exact earrings listed in the CraftyHope etsy shop.
Flower and Rusty Key Earrings in the shop

And, I'm hoping to get the CraftyHope newsletter up and running very soon. I'll be kicking it off with a coupon code, so make sure to sign up!


Oh, and if you have any questions about how to make your own earrings, please don't hesitate to ask!

This is linked up at Coastal Charm's Show and Share and Talk of the Town Link Party.

This post contains affiliate links as a means for sites to earn advertising fees by advertising and linking to amazon.com

Currently I'm . . .

Cooking some very standard comfort dinners for the most part because our Blue Apron delivery comes in tomorrow, and those meals will be much less ordinary.

Creating by testing out some chalk paint on tin cans, cutting out tin from old containers, playing in my art journal - basically, getting my hands messy any way I can.

Eating a healthy-ish breakfast of plain greek yogurt, berries, honey, and homemade granola.

Enjoying the pop of color in the azaleas outside my window (though they are withering some).

Feeling a little stopped up from the result of allergies because the azaleas have decided to bloom.

Hoping to get to the bead store today to finish my shopping for the Bead Peeps Swap N Hop.

Listing these Flower and Rusty Key earrings in the CraftyHope Etsy shop.

Looking forward to seeing my oldest niece march with her high school marching band in the Crewe of Columbus Mardi Gras parade tomorrow night.

Loving the progress on my kitchen.

Needing to put some effort into exercising.

Reading Alice I have Been. I JUST started it so I don't have much to say about it yet.

Sewing nothing at the moment, but I’m ready to get started on some projects like curtains and placemats for the living and dining rooms.

Wanting to check off all the tasks on my bullet journal today (but I know that’s probably wishful thinking).

I guess it’s time to be done so I can get to it. So, what are you up to?

Renovations Part 4 - Floors

The renovations have absolutely consumed me as of late. But, all the work has paid off, and I have another update for you. The floors are FINISHED!!

If you'll recall, this is what we were dealing with a few weeks ago.


No flooring in the dining room, kitchen, or hallway.

If you follow me on Instagram or Twitter, you've likely seen glimpses of the progress.
I have to admit that Pat laid all of the tile himself. He said it was a one-person job and just wouldn't let me help. He opened three boxes of tiles at a time and "shuffled" them to try to keep from having a pattern of the tiles on the floor. We wanted it as random as possible to achieve a wood floor look, despite the tiles being porcelain. He mixed and spread the multi-set, set the tiles, and used 1/8 inch spacers between them. He did buy and start with some leveling spacers, but found them cumbersome and time-consuming. So, after the first day, he stopped using them.

The tiles were laid by thirds to keep them offset and not lined up. Again, this was done to achieve more of the wood-floor look. For the most part, he laid the whole tiles first then worked on the edges and cut areas. It took longer than expected and was fairly back-breaking work as he was on his hands and knees for the most part.

Once all the tiles were laid, multi-set dried, and spacers removed; I did the grout work. Pat helped by mixing the grout and fetching me buckets of fresh water. The grout was spread along the tile lines and pressed into the holes well. I worked in about 3 foot by 3 foot sections. Once the grout was spread, I used a large sponge to wipe away the excess. It took me three days to do the whole area. I finished almost a week ago and there's still grout under my nails and my hands are still sore. But, it was SO WORTH IT!

Once the grout was done, I used an old t-shirt to buff the area. The floor can't be mopped for something like ten days while it cures. But, I've swept it several times!

We went with a dark brown grout in hopes that it would blend with the tiles. So far, I think it looks fabulous.

Also note that we (Pat) removed the base boards to install the tile. This helps hide the seams of the tiles.

Here's a few final looks at the progress.


And for a final glimpse of just how awesome this whole renovation is going. . .

Amazing, right!?

There's still a bit to do: paint & install baseboards, put in transition plates (including on the step in the living room), build an island and corner cabinets in the kitchen, and replace the countertops and backsplash, build a bookcase in the dining room. You know. . .not much more. But, we're so close we're absolutely basking in it. Once the transition plates go down, we can actually take a breather.

I should have another update VERY soon because the baseboards went in yesterday. I just have to take some pictures.

Oh, and if you're interested in seeing the whole progression up to this point, here's Renovations Part 1, Renovations Part 2, and Renovations Part 3.

Easy Lunch: Pizza Quesadilla

I have to admit it, lunches around here can be a bit boring.  I tend to offer the same, sad choices: sandwiches (ham or PB&J), tuna salad with noodles, leftovers, bean burritos, or something picked up from elsewhere. Every once in a while, I'll shake things up a bit with a fried rice or soup with grilled cheese. Seriously, THOSE are our exciting lunch options. So when I suggested pizza quesadillas, it was a perfect veer from the usual. And, it was SO EASY!
Easy Lunch Pizza Quesadillas

I simply started by melting a bit of butter in a small pan on medium heat.

Once the butter was nice and hot, a flour tortilla was place in the pan.

I topped the tortilla with a sprinkling of shredded mozzarella cheese.

Next came the rest of the toppings: pepperoni and onions. If I had had some mushrooms or tomatoes or fresh basil, I would have added those too. You do you though. Throw on some bell peppers or olives or whatever makes your pizza-loving heart happy. But, work fast!

Add another sprinkle of mozzarella.

Top with another flour tortilla.

Once the bottom tortilla starts to brown, flip it over to brown the other side.

Slice the quesadilla and serve with marinara sauce for dipping. 

As you can see, I added some sliced apples to round out the lunch. So easy and so good!! Oh, and quick tip - I use a pizza roller to cut our quesadillas (whether they're pizza-themed or not). It's so much easier than using a knife to do it.

Here are the complete instructions:

Pizza Quesadilla

Ingredients: (for 1 quesadilla)
1 tsp. butter
2 small flour tortillas
1/4 C shredded mozzarella cheese
1/4 C marinara sauce
Toppings of your choice: pepperoni, onions, mushrooms, garlic, olives, bell peppers, sausage, bacon, chicken, other cheeses, really the choices are endless.

Directions:
1. Heat butter in a small pan on medium heat until melted.
2. Place one tortilla in the pan, top with half the cheese. 
3. Add pizza toppings then the rest of the cheese.
4. Place other tortilla over the top of the first.
5. When bottom tortilla toasts to your liking, flip the quesadilla.
6. Toast until the other side is browned as well.
7. Move pizza quesadilla to your plate, slice it, and serve with marinara sauce on the side.

Now, I've shared a lunch option that's a little different. Please let me know what you do to shake lunch up. I'm in desperate need of some variety! 

Introduction for Bead Peeps Swap n Hop

I'm participating in the Bead Peeps Swap n Hop this year. While this is the third year of the challenge, It's my first time participating. Basically, you are paired up with another jewelry artist and the two of you swap a focal, beads, and a clasp. One of those elements need to be artist-made, and you have to send at least two of those three elements. From there, you make jewelry from the pieces received! Fun stuff!!
Bead Peeps is a Facebook group administered by Linda Anderson. We were supposed to get an intro post up before she made the partner assignments. However, I was so busy with the ball (Mardi Gras) and family obligations that I completely missed that somehow. Despite missing the deadline, I still want to make this post for future reference. I'm tossing in some examples of my jewelry designs throughout this post to give examples of my work. Here we go!


A scrapbooking keyhole is the focal with a small Gaea flower connector. Vintaj wire was used to wrap glass pearls and glass beads to make the chain.


The arc on these is from some old earrings I took apart. The beads are a combination of glass, stone, and metal beads that worked well together.

I've been making jewelry for over 15 years. In that time, I've experimented and played with many techniques: decoupage, polymer clay, precious metal clay, metal etching, resin, etc. I started with stringing, but really love to use wire in my work. Though, stringing and knotting do come into play occasionally.
The color palette for this was a little out of my comfort zone, but I do love it. It incorporates a vintage button and vintage glass beads, freshwater pearls, stone beads, and seed beads into a really cute bracelet.

This was made for ZnetShows' Creative Spark publication and includes their cultured sea glass and tiny Chinese crystals. I really like the layering of this necklace.

Beads are indeed a staple in my work, but my favorite is designing with the unusual. This includes recycling old jewelry from thrift and antique stores, using hardware, upcycling items found on the street, etc. However, I'm not completely consistent with those methods. It just depends on the materials. In addition, I enjoy altering materials (both typical and the unusual) to suit my needs.
The dangly parts of this necklace are almost all found objects! A scrapbook brad and a wired resin piece I made are also included. I wear this necklace often.

Playing with wire, I came up with these earrings. I love how the Czech glass beads slide side to side on their bar.

For years I've had a hard time defining my style. I now feel as though my focus is beginning to narrow. Most of the pieces I make and like tend to have a romantic and boho feel to them. However, a bit of tribal does get thrown in from time to time.
These feel both romantic and tribal to me. The softness of the Lucite flower and pink beads are contrasted with the dark wood and shiny metal.

All of the charms in this bracelet came from old jewelry. Most of them are post earrings I wasn't sure how else to use. I incorporated a variety of jump rings in order to give it a slightly less fancy feel.

I often use glass and stone beads and antiqued metals. Though, that's not consistently the case - I will use a shiny gold or silver tone depending on how I'm inspired. And, I don't always use beads - buttons are a real favorite of mine and seem to worm their way into my pieces.
I made the stacked button focal before the necklace came together. The collar style of necklace is just so cute. I think it pairs well with the buttons.

I found the Webb Co. tag in an antique store and knew it would be a great addition to a long necklace. To add to the found object feel, the mother of pearl buttons were included in the chain.

I veer toward anything rustic, old, vintage-y. I love most colors, but do have a hard time incorporating anything too bright into my jewelry. Blues, greens, and neutrals tend to be my go-tos.
That's a guitar volume knob as the focal to this necklace. I kept a simple palette with an array of beads to accent the knob. 

I bought the altered copper charms from Bandana Girl and simply added some coordinating beads.

I'd like to say that I'm inspired by nature, but in reality I think it's the materials themselves that spark my imagination and creativity.
I had these holey bone beads for ages before I felt inspired to cage them in with some darkened annealed wire.

This is one of the most recent listing in my etsy shop. Again, I used a scrapbooking keyhole in antiqued brass. The green beads and bead caps are from ZnetShows.com. It all seemed to just fall together perfectly.

That about sums me up. There's probably something I've left out of this. Please don't hesitate to ask in the comments.

Oh, and let me introduce my partner - Kari Asbury. She's using her Instagram to post about this swap, but she also has a blog on her KariAsbury.com website that she uses from time to time as well. Go check out her stuff. It looks like we have similar styles!

The 100 Day Project 2024

Yesterday, the 100 Day Project for 2024 started (it's not too late to join in!!) I mentioned last week that I would give you a heads-up ...