

I've already covered Tools and Materials as well as had a guest poster go over cords, ribbons, and laces. In this part of the series, I'm covering jewelry findings.
")
Let me start by explaining that jewelry findings are the pieces used to help join together your components and finish your design. They are the backbone to your jewelry-making. I'm only covering the basics in this post as it is intended for beginners. There are many, many more findings out there that you will discover as you learn more. Please note that though I've shown these findings all in a silvertone or antiqued brass, findings can be found in an array of other metal types: gold, copper, gunmetal, etc. Check you local bead store or craft store and you'll see what I mean. As with my other two posts, I made a video to show you the findings in more detail, but this blog post has more concise information.

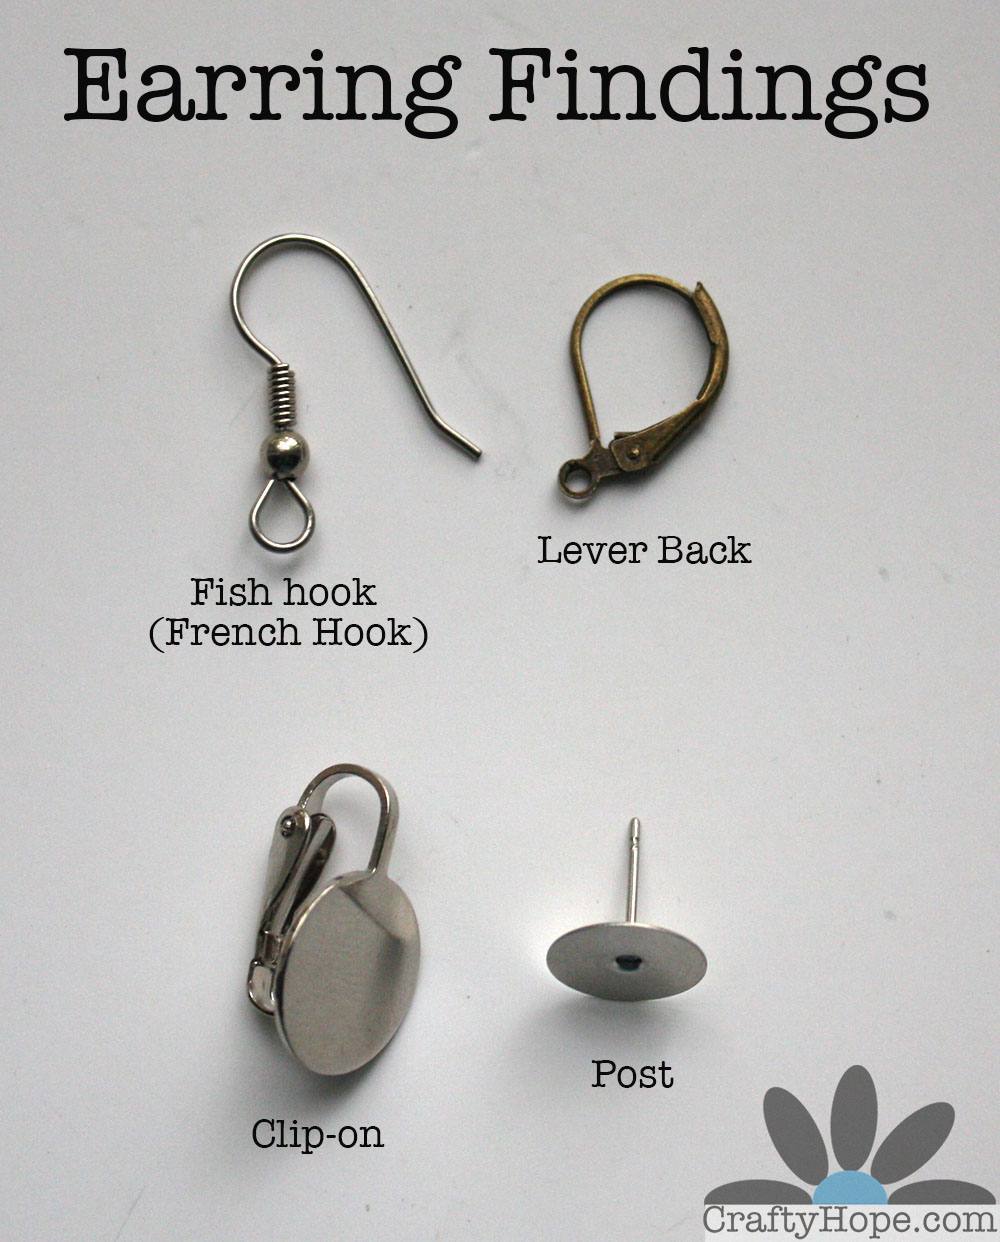
Earring Findings - Earring findings are generally limited to use in earrings. Though, I have seen clip-on earrings interchanged with shoe clips in a few instances.
Fish Hook or French Hook: These earring findings are generally shaped like a hook with a loop at the bottom. Usually, the easiest to find ones have a small bead and a coil of wire on them like the one pictured above. Some people do not like to wear this type of earring as they are known to come out of ear holes. A small rubber/plastic "back" will help prevent this from happening. These backs have to purchased separately.
Lever Back: With a lever that closes the ear wire, this type of earring finding is more secure than the fish hook. However, they are a little harder to find and a tad more expensive.
Clip-on: This type of earring finding is typically for those without pierced ears. However, individuals who don't want to fiddle with getting the wires into their holes will sometimes wear them as well. They work much like the levered back ear wires but without the wire. These have become less popular as more and more people have pierced ears. As such, they can sometimes be hard to find. While the one shown has a flat surface for gluing items, other shapes exist - including ones with loops for hanging components.
Post: Anyone with pierced ears is familiar with the post earring. It is the most basic as it is simply a stick coming off the back of the earring. Post earrings should always be worn with an earring back. The backs usually come with this type of finding. The example pictured above has a flat surface for gluing. However, there are other shapes, including types that have loops for hanging items.

Basic Findings - These pieces are used in making most any type of jewelry. They are definitely what you want to start with in your learning process.
Eye-pins: Much like a head pin, eye pins differ in that they have a loop (an eye) on the end. This loop makes it so that the pin can be connected to other findings or components in the design. Like head pins, they are for stringing on beads and are finished with another loop.
Jump rings: A loop of sturdy wire with a small opening is all there is to a jump ring. The ones pictured above are circular in shape, but jump rings can also be found in other shapes (ovals, squares, triangles, etc.) As you can see, they come in a variety of sizes. This gives you options for each of your projects. The purpose of jump rings is to connect one component to another. Though, they can also be used as design elements or in chainmaille designs. Jump rings can be found in almost any jewelry project.

Crimps and Accessories - The above findings are used with a variety of specific materials (beading wire, cord, leather, etc.) and help finish off their ends.
Crimp tubes and Crimp beads: These two are interchangeable. They are used specifically with beading wire (though can also be used on other thin materials like thread and fishing line) to loop off the ends of the wire and keep beads from falling off. Crimp beads and tubes work by sliding onto the wire, the wire is looped back through it, and the crimp is flattened to seal the hole. Crimping pliers are often used to crimp and flatten the beads/tubes, but are not necessary.
Crimp Covers: Crimps themselves are not the most attractive, and some feel that they detract from the beauty of a design. Crimp covers help remedy this problem. They are basically open, hollow beads that slip over flattened crimp beads and tubes. Smashing them closed seals them over the crimps and makes them look like little beads in the design.
Wire Guards: These U-shaped findings are also used wth beading wire. They go on at the ends of a piece where the wire is looped back through (especially at a crimp bead/tube). The open ends of the U are pushed together where the wire comes together. Wire Guards help protect beading wire from wear and becoming frayed. They protect the wire but are not necessary.
Fold Over and Spring Coil Crimps: These are two other examples of crimp types. They are most often used with cord, fiber, and leather. The material is fitted into the crimp and then it is smashed. In the fold over ones, the raised tabs are tightly folded over the material. For the spring coil ones, the end of the coil is squeezed down to secure the material. In both cases, glue can also be used to further secure the material in the crimp.
Again, there are tons more basic findings out there: bails, bezels, other clasps and earring findings, connectors, crimp types, bangles, blanks, and more. My aim is simply to cover some of the most-used items and break them down for you so that you aren't overwhelmed. I trust that as you get more involved in jewelry-making, you'll learn about these other jewelry findings.
To those out there who do make jewelry, let me know if you feel I've omitted or mis-represented any findings. Please ask me any questions you have about findings and I'll do my best to answer them. We'll get to working with these jewelry findings very soon!


Once again, a great post Hope
ReplyDeleteI forgot to take a photo, or to mention to you when I saw you this weekend that I used your techniques from one of these tutorials to make a bracelet for a teenager's birthday present on Saturday. We put two designs from her favorite anime into bottle caps, and then connected and finished the bracelet with several bead stacks made on eye pins. I had never thought to link together several eye pins to make up a bracelet or necklace until I read your tutorial. So thank you! ;)
ReplyDelete-Pezz
Pezz, That's so awesome! What's even funnier is that today I filmed several more videos including one in which I demonstrate how to make a chain with simple loops. Ha! So glad that my tutorials are already paying off!! Yay!
DeleteI am a beginner.. and this is super useful! still trying to figure everything out. so thank you!
ReplyDeleteI'm so glad you found me and found the info helpful! Please don't hesitate to ask questions. I'll be adding more info and techniques soon! Thanks for popping in!
DeleteI remember watching videos with pen and paper to write down what I need. This post would've been very helpful. Besides, this is how I learn the names of findings in English :) I would add to this thorough list the split jump rings as they are more secure for certain applications as well as the fancy crimp bead cord ends https://youtu.be/6OHPeTi9ef0 - this is not a basic finding but an interesting one :)
ReplyDeleteThank you so much, your postings are sooo helpful i am at the beginning stages but i do a lot of crafting, sewing and more. Soo it comes a bit easier for me. Just have to learn what is what and how to use it all. Very glad i found you. Greetings from Huntsville, Al
ReplyDeleteHi Rena! Welcome!! I'm so glad I can help you on this journey. Please don't hesitate to ask away if you have any questions at all. I'm happy to help.
Delete